- Css Change Button Style After Click
- Reset button style after 2nd click
- How to style a clicked button in CSS
- Change the color of a button when clicked with javascript
- Change Bootstrap CSS for a button property after click
- How to Keep :active CSS Style After Click a Button
- Prerequisite: Create an HTML File
- What is :active in CSS?
- Style “nav-btn” Class
- How to Keep CSS :active Style After clicking a Button?
- jQuery Code
- Conclusion
- About the author
- Nadia Bano
- CSS Button Tutorial – How to Styling HTML Buttons with CSS
- A simple “Get Started” button
- Then create the gradients:
- Then give the curved edge for the button
- How to Trigger a button on-hover event
- How to Add a Transparent Background to a CSS Button
- /* Text color */
- /* Remove background color */
- /* Border thickness, line style, and color */
- /* Adds curve to border corners */
- /* Make letters uppercase */
- /*button on hover*/
- Button with CSS Entities
- Button with click animation
- Full CSS: (SCSS)
- Button with an image
- Button with icons
- Conclusion
Css Change Button Style After Click
If you’re looking for a pure css option, try using the :focus pseudo class.
#style background-color: red;
>

#style:focus <
background-color:yellow;
>
Reset button style after 2nd click
You can use javascript on the onclick event to modify the button classList, please check the sample below
#button1 height:50px;
width:170px;
border-style: solid;
font-weight: 700;
text-transform: uppercase;
font-size: 0.875rem;
letter-spacing: 1px;
font-family: "Roboto", serif;
background-image: none;
box-shadow: 2px 2px 8px 0 rgba(128,128,128,1);
margin: 0 auto 0;
border-color: white;
color:white;
background-color:rgb(4, 30, 78);
border-radius: 30px;
>

#button1.active background-color: white;
color:rgb(4, 30, 78);
border-color:rgb(4, 30, 78);
cursor:pointer;
>
How to style a clicked button in CSS
This button will appear yellow initially. On hover it will turn orange. When you click it, it will turn red. I used :hover and :focus to adapt the style.
(The :active selector is usually used of links (i.e. tags))
button< background-color:yellow;>
button:hover
button:focus
a < color: orange;>
a.button< color:green; text-decoration: none;>
a:visited < color: purple;>
a:active
Change the color of a button when clicked with javascript
You’ll need to set up an event handler so that when any button gets clicked, all the buttons are reset so that no one of them is active. Then, set the clicked button to be active by styling it. But, instead of setting up multiple handlers, just set up one at the document level that will receive any clicks via bubbling («event delegation»).
// Get all the buttons into a node list
let buttons = document.querySelectorAll(".button-categories-link");

// Set an event handler on the document so that when
// any element is clicked, the event will bubble up to it
document.addEventListener("click", function(evt) // Check to see if it was a button that was clicked
if(evt.target.classList.contains("button-categories-link")) // Loop over all the buttons & remove the active class
buttons.forEach(function(button) button.classList.remove("active");
>);
// Make the clicked button have the active class
evt.target.classList.add("active");
>
>);
Candidates

Contacts/Guests

Jobs

Clients
Change Bootstrap CSS for a button property after click
What you are missing is the :focus pseudo element and focus class, i.e.
.btn-primary:focus,
.btn-primary.focus, color: #fff;
background-color: #EB984E;
border-color: #EB984E;
>
FYI, you have a few mistakes in your CSS: you are using ##EB984E (i.e. double # ) in some rules instead of #EB984E .
Also FYI a few notes on how to style buttons for usability and accessibility:
- you are using the same colour for hover — this should be a different colour to indicate that the button is active and ready to be clicked.
- You also use the same colour for the focus outline — this outline is used to show which button has focus when the site is being used with a keyboard. It is usually a different colour to highlight this, although as long as it’s clear which has focus its ok.
Now, your code working the way you want (but I highly recommend you consider the above points for your live site) 🙂
.buttoncontainer padding: 20px;
text-align: center;
>
.btn:focus,
.btn.focus outline: 0;
box-shadow: 0 0 0 0.2rem #EB984E;
>
.btn-primary color: #fff;
background-color: #EB984E;
border-color: #EB984E;
>
.btn-primary:focus,
.btn-primary.focus,
.btn-primary:hover color: #fff;
background-color: #EB984E;
border-color: #EB984E;
>
.btn-primary:focus,
.btn-primary.focus box-shadow: 0 0 0 0.2rem #EB984E;
>
.btn-primary.disabled,
.btn-primary:disabled color: #fff;
background-color: #EB984E;
border-color: #EB984E;
>
.btn-primary:not(:disabled):not(.disabled):active,
.btn-primary:not(:disabled):not(.disabled).active,
.show>.btn-primary.dropdown-toggle color: #fff;
background-color: #EB984E;
border-color: #EB984E;
>
.btn-primary:not(:disabled):not(.disabled):active:focus,
.btn-primary:not(:disabled):not(.disabled).active:focus,
.show>.btn-primary.dropdown-toggle:focus box-shadow: 0 0 0 0.2rem #EB984E;
>
.buttons input:focus outline: none;
>
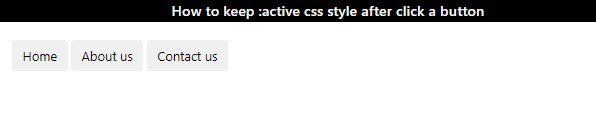
How to Keep :active CSS Style After Click a Button
![]()
In CSS, the pseudo-class specifies the specific state of the selected elements. With the help of these classes, several styling properties are added to style the specific part of the elements. However, jQuery is a specific JavaScript library that provides methods that help with CSS functionalities, such as keeping the button active after clicking on it.
This write-up will discuss:
Prerequisite: Create an HTML File
In HTML, add three “ ” elements and assign each the “btn” and “nav-btn” classes:
Now, let’s refers to the main subject of our post.
What is :active in CSS?
The “:active” pseudo-class indicates the element that is in an active state. In CSS, this class is specified with the elements to be styled as active, such as buttons, links, or more.
Style “nav-btn” Class
The “.nav-btn:active” is used to access the class “nav-btn”. This class is set with the “:active” pseudo-class and applied the following properties to show the button’s active state when clicked by the user:
- “background-color” changes the element’s background color.
- “color” specifies the font color.
- “font-weight” defines the font’s thickness.
The above output verifies that the buttons’ styling changes when clicked by the users. However, they are not keeping their active state and fade away after the click.
How to Keep CSS :active Style After clicking a Button?
jQuery can be used to keep the active state of the buttons. For this purpose, add the styles within the class “nav-btn” and append the class “.active” with it:
jQuery Code
In the “ ” tag add the following code:
$ ( «.nav-btn» ) . on ( «click» , function ( ) {
$ ( «.nav-btn» ) . removeClass ( «active» ) ;
Here is the description of the above code:
- The “$()” is the shortcut function of the “getElementById”.
- The “.nav-btn” is the class accessed through this function.
- The “.on(click, function()” denotes the function which will be triggered on the button click.
- The “$(“.nav-btn”).removeClass(“active”);” remove the styles from each button and implement the styles when the button is clicked.
- “$(this).addClass(“active”);” signifies that the styles must only be applied to that button that is currently clicked.
That’s it! You have successfully learned how to maintain CSS “:active” style after a button click.
Conclusion
To keep the active state of a button, jQuery methods are used. For this purpose, first, access the button by using the “$()” method. Then, define the function to apply the active state styles on mouse click. Implement the event handler and the function. The function will first remove the styles from each button. Then, “$(this)” is used with the “:addClass()” to keep the active state of the button. This article has demonstrated the procedure for keeping CSS :active style after clicking a button.
About the author
Nadia Bano
I am an enthusiastic and forward-looking software engineer with an aim to explore the global software industry. I love to write articles on advanced-level designing, coding, and testing.
CSS Button Tutorial – How to Styling HTML Buttons with CSS

Buttons have become an inevitable part of front end development. Thus, it is important to keep in mind a few things before you start styling buttons. I have gathered some of the ways of styling buttons using CSS.
A simple “Get Started” button
First, create the button class itself:
Then create the gradients:
background-image: -webkit-linear-gradient(top, #eb94d0, #2079b0); background-image: -moz-linear-gradient(top, #eb94d0, #2079b0); background-image: -ms-linear-gradient(top, #eb94d0, #2079b0); background-image: -o-linear-gradient(top, #eb94d0, #2079b0); background-image: linear-gradient(to bottom, #eb94d0, #2079b0);Then give the curved edge for the button
-webkit-border-radius: 28; -moz-border-radius: 28; border-radius: 28px; text-shadow: 3px 2px 1px #9daef5; -webkit-box-shadow: 6px 5px 24px #666666; -moz-box-shadow: 6px 5px 24px #666666; box-shadow: 6px 5px 24px #666666; font-family: Arial; color: #fafafa; font-size: 27px; padding: 19px; text-decoration: none;>How to Trigger a button on-hover event
How to Add a Transparent Background to a CSS Button
/* Text color */
/* Remove background color */
/* Border thickness, line style, and color */
/* Adds curve to border corners */
/* Make letters uppercase */
border: none; color: white; padding: 16px 32px; text-align: center; display: inline-block; font-size: 16px; margin: 4px 2px; -webkit-transition-duration: 0.4s; /* Safari */ transition-duration: 0.4s; cursor: pointer; text-decoration: none; text-transform: uppercase; > .btn1
/*button on hover*/
Button with CSS Entities
.button span:after < content: '\00bb'; /* CSS Entities. To use HTML Entities, use →*/ position: absolute; opacity: 0; top: 0; right: -20px; transition: 0.5s;>.button:hover span < padding-right: 25px;>.button:hover span:after
Button with click animation
Full CSS: (SCSS)
$gray: #bbbbbb; * < font-family: 'Roboto', sans-serif;>.container < position: absolute; top:50%; left:50%; margin-left: -65px; margin-top: -20px; width: 130px; height: 40px; text-align: center; >.btn < color: #0099CC; /* Text color */ background: transparent; /* Remove background color */ border: 2px solid #0099CC; /* Border thickness, line style, and color */ border-radius: 70px; /* Adds curve to border corners */ text-decoration: none; text-transform: uppercase; /* Make letters uppercase */ border: none; color: white; padding: 16px 32px; text-align: center; text-decoration: none; display: inline-block; font-size: 16px; margin: 4px 2px; -webkit-transition-duration: 0.4s; /* Safari */ transition-duration: 0.4s; cursor: pointer;>.btn1 < background-color: white; color: black; border: 2px solid #008CBA;>.btn1:hover < background-color: #008CBA; color: white; >&:active < letter-spacing: 2px ; >&:after < content:""; >>.onclic < width: 10px !important; height: 70px !important; border-radius: 50% !important; border-color:$gray; border-width:4px; font-size:0; border-left-color: #008CBA; animation: rotating 2s 0.25s linear infinite; &:hover < color: dodgerblue; background: white; >>.validate < content:""; font-size:16px; color: black; background: dodgerblue; border-radius: 50px; &:after < font-family:'FontAwesome'; content:" done \f00c"; >> b < outline:none; height: 40px; text-align: center; width: 130px; border-radius:100px; background: #fff; border: 2px solid #008CBA; color: #008CBA; letter-spacing:1px; text-shadow:0; font:< size:12px; weight:bold; >cursor: pointer; transition: all 0.25s ease; @keyframes rotating < from < transform: rotate(0deg); >to < transform: rotate(360deg); >>function validate() < setTimeout(function() < $("#button").removeClass("onclic"); $("#button").addClass("validate", 450, callback); >, 2250); > function callback() < setTimeout(function() < $("#button").removeClass("validate"); >, 1250); >>);Button with an image
Button with icons
button< border: none; border-radius: 50px;>html,body < font-size: 20px; min-height: 100%; overflow: hidden; font-family: "Helvetica Neue", Helvetica, sans-serif; text-align: center;>.text < padding-top: 50px; font-family: "Helvetica Neue", Helvetica, 'Lucida Sans Unicode', Geneva, Verdana, sans-serif; >.text:hover< cursor: pointer; color: #1565C0;>.main < padding: 0px 0px 0px 0px; margin: 0; background-image: url("https://someimg"); text-align: center; background-size: 100% !important; background-repeat: no-repeat; width: 900px; height: 700px; >.icon-button < background-color: white; border-radius: 3.6rem; cursor: pointer; display: inline-block; font-size: 2rem; height: 3.6rem; line-height: 3.6rem; margin: 0 5px; position: relative; text-align: center; -webkit-user-select: none; -moz-user-select: none; -ms-user-select: none; user-select: none; width: 3.6rem;>.icon-button span < border-radius: 0; display: block; height: 0; left: 50%; margin: 0; position: absolute; top: 50%; -webkit-transition: all 0.3s; -moz-transition: all 0.3s; -o-transition: all 0.3s; transition: all 0.3s; width: 0;>.icon-button:hover span < width: 3.6rem; height: 3.6rem; border-radius: 3.6rem; margin: -1.8rem;>.twitter span < background-color: #4099ff;>/* Icons */.icon-button i < background: none; color: white; height: 3.6rem; left: 0; line-height: 3.6rem; position: absolute; top: 0; -webkit-transition: all 0.3s; -moz-transition: all 0.3s; -o-transition: all 0.3s; transition: all 0.3s; width: 3.6rem; z-index: 10;>.icon-button .icon-twitter < color: #4099ff;>.icon-button:hover .icon-twitter Conclusion
In this tutorial, you’ve learned how to customize buttons using CSS and a bit of Javascript if you need the “after click” function. You can also use CSS3ButtonGenerator to generate simple buttons. Feel free to ping me if you have any questions.