- CSS Панель навигации
- Панель навигации = список ссылок
- Пример
- Пример
- Сообщить об ошибке
- Ваше предложение:
- Спасибо Вам за то, что помогаете!
- Simple Top Navigation Menu Using HTML and CSS — [With Source Code]
- Creating The Folder Structure For Website
- Creating The HTML Structure
- Создаем адаптивную навигацию на сайте
- HTML
- CSS
- Media Queries
- Отображение навигации
- CSS Navigation Bar
- Navigation Bar = List of Links
- Example
- Example
- COLOR PICKER
- Report Error
- Thank You For Helping Us!
CSS Панель навигации
Наличие простой в использовании навигации важно для любого веб сайта.
С помощью CSS вы можете превратить скучные HTML меню в красивые навигационные панели
Панель навигации = список ссылок
Панель навигации нуждается в стандартном HTML в качестве основы.
В наших примерах мы построим панель навигации из стандартного HTML списка.
Пример
Теперь давайте удалим маркеры, поля и отступы из списка:
Пример
- list-style-type: none; — Убирает маркеры. В панели навигации не нужны маркеры для списка
- Установить margin: 0; и padding: 0; чтобы удалить настройки браузера по умолчанию
Код в приведенном выше примере — это стандартный код, используется как на вертикальной, так и на горизонтальной панели навигации.
Мы только что запустили
SchoolsW3 видео
Сообщить об ошибке
Если вы хотите сообщить об ошибке или внести предложение, не стесняйтесь отправлять на электронное письмо:
Ваше предложение:
Спасибо Вам за то, что помогаете!
Ваше сообщение было отправлено в SchoolsW3.
ТОП Учебники
ТОП Справочники
ТОП Примеры
SchoolsW3 оптимизирован для бесплатного обучения, проверки и подготовки знаний. Примеры в редакторе упрощают и улучшают чтение и базовое понимание. Учебники, ссылки, примеры постоянно пересматриваются, чтобы избежать ошибок, но не возможно гарантировать полную правильность всего содержания. Некоторые страницы сайта могут быть не переведены на РУССКИЙ язык, можно отправить страницу как ошибку, так же можете самостоятельно заняться переводом. Используя данный сайт, вы соглашаетесь прочитать и принять Условия к использованию, Cookies и политика конфиденциальности.
Simple Top Navigation Menu Using HTML and CSS — [With Source Code]
Every website needs some sort of navigation so that users coming onto this web page can easily navigate between the pages of the website.
There are so many different navigation menus one can create like side navigation on a website, top navigation that stays on the top, maybe, one on the right side?
Well wherever you place it, these navigation menus or navbar menus are really an essential part of a website.
Creating them from scratch can not be so straightforward when you are just starting with HTML and CSS coding.
So in this blog post, we will create a top navigation menu or navbar from scratch using HTML and CSS and I will also attach the source code for it.
Creating The Folder Structure For Website
I have created a folder for myself called Nav1 and inside this folder with Visual Studio code which will be my editor in which I will write my HTML and CSS code.
Once the folder is open in visual studio code, I will create two files, an index.html and a style.css file.
Creating The HTML Structure
We will start by creating the basic HTML structure for our website.
We are using the Emmet extension for visual studio code so we will start writing html and Emmet will give us the boilerplate HTML structure for the website.
Then we will link our style.css to the HTML page.
Then we will go ahead and add some elements to our body of the website.
From the above image we can see that we have added a header element inside our body.
Inside the header tag, we have created two elements, 1 is an anchor element which will be used as a placeholder for the logo for our website.
The other element inside the header is the nav element. Nav elements are usually kept for adding menu to the navigations.
Inside the nav we have an unordered list and a few elements inside it defining the pages that we want the user to navigate to using anchor elements.
This is how our HTML looks like in a browser till now.
The next step is to add some CSS styles to these elements that we have created so that our website looks the way we want it to look.
The first thing we will do, and this is totally optional is to add a font to your website. In this example, I am using Google Quicksand Font. The usage of the font is explained in the image above.
By adding the above css code, we give our header a display property of flex and make the alignment for the header. After these above css changes the header looks like this.
Then we add some more styles to the nav and the header as below
This gives the color and styles to the nav and header.
Создаем адаптивную навигацию на сайте
Одна из самых непростых задач в верстке адаптивного сайта — это навигация. В этой статье подробно описан один из способов реализации адаптивного меню.
HTML
Прежде всего необходимо в тег HEAD добавить meta viewport для масштабирования на любом устройстве:
Затем добавляем пункты меню в виде обычного списка:
В меню 6 основных пунктов, а также дополнительный, для того, чтобы раскрывать навигацию на маленьких экранах.
CSS
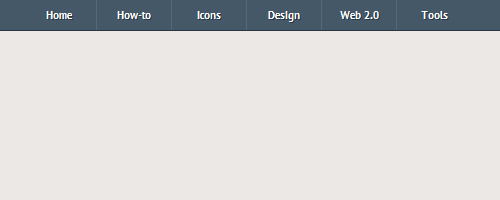
Пункты меню должны следовать друг за другом, используем float:
.clearfix:before, .clearfix:after < content: " "; display: table; >.clearfix:after < clear: both; >.clearfix
Каждый пункт меню шириной 100 пикселей:
nav a < color: #fff; display: inline-block; width: 100px; text-align: center; text-decoration: none; line-height: 40px; text-shadow: 1px 1px 0px #283744; >nav li a < border-right: 1px solid #576979; box-sizing:border-box; -moz-box-sizing:border-box; -webkit-box-sizing:border-box; >nav li:last-child a < border-right: 0; >nav a:hover, nav a:active
Дополнительный пункт на больших экранах должен быть скрыт:
Сейчас меню корректно отображается только на большом экране:
Media Queries
CSS3 media queries определяют, какие стили будут использоваться в каждой конкретной ситуации (например при разных разрешениях экрана).

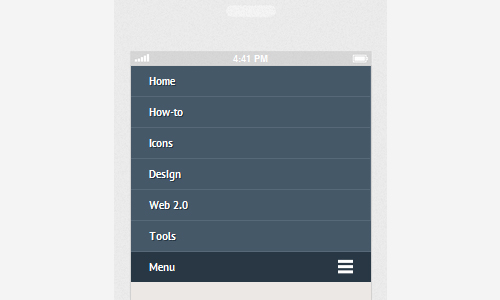
В нашем меню при разрешении менее 600 пикселей в ширину пункты навигации должны отображаться в два столбца:

@media screen and (max-width: 600px) < nav < height: auto; >nav ul < width: 100%; display: block; height: auto; >nav li < width: 50%; float: left; position: relative; >nav li a < border-bottom: 1px solid #576979; border-right: 1px solid #576979; >nav a < text-align: left; width: 100%; text-indent: 25px; >> При разрешении экрана менее 480 пикселей, должна появляться дополнительная кнопка меню, по нажатию которой раскрывается вся навигация:
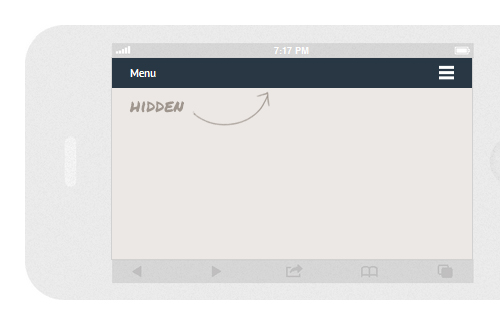
@media only screen and (max-width : 480px) < nav < border-bottom: 0; >nav ul < display: none; height: auto; >nav a#pull < display: block; background-color: #283744; width: 100%; position: relative; >nav a#pull:after < content:""; background: url('nav-icon.png') no-repeat; width: 30px; height: 30px; display: inline-block; position: absolute; rightright: 15px; top: 10px; >> При разрешении менее 320 пикселей меню должно отображаться в один столбец:
@media only screen and (max-width : 320px) < nav li < display: block; float: none; width: 100%; >nav li a < border-bottom: 1px solid #576979; >> Отображение навигации
При помощи slideToggle() отображаем все меню на больших экранах и скрываем на маленьких:
$(function() < var pull = $('#pull'); menu = $('nav ul'); menuHeight = menu.height(); $(pull).on('click', function(e) < e.preventDefault(); menu.slideToggle(); >); $(window).resize(function() < var w = $(window).width(); if(w >320 && menu.is(':hidden')) < menu.removeAttr('style'); >>); >); Готово! Получилась навигация, которой удобно пользоваться на устройствах с любым разрешением экрана.
CSS Navigation Bar
Having easy-to-use navigation is important for any web site.
With CSS you can transform boring HTML menus into good-looking navigation bars.
Navigation Bar = List of Links
A navigation bar needs standard HTML as a base.
In our examples we will build the navigation bar from a standard HTML list.
- and
elements makes perfect sense:
Example
Now let’s remove the bullets and the margins and padding from the list:
Example
- list-style-type: none; — Removes the bullets. A navigation bar does not need list markers
- Set margin: 0; and padding: 0; to remove browser default settings
The code in the example above is the standard code used in both vertical, and horizontal navigation bars, which you will learn more about in the next chapters.

COLOR PICKER


Report Error
If you want to report an error, or if you want to make a suggestion, do not hesitate to send us an e-mail:
Thank You For Helping Us!
Your message has been sent to W3Schools.
Top Tutorials
Top References
Top Examples
Get Certified
W3Schools is optimized for learning and training. Examples might be simplified to improve reading and learning. Tutorials, references, and examples are constantly reviewed to avoid errors, but we cannot warrant full correctness of all content. While using W3Schools, you agree to have read and accepted our terms of use, cookie and privacy policy.