- Send Email With Attachments In PHP (Simple Examples)
- TLDR – QUICK SLIDES
- TABLE OF CONTENTS
- PHP MAIL ATTACHMENT
- PART 1) ATTACH A SINGLE FILE
- EXTRA) MANUAL FORMATTING
- PART 2) ATTACH MULTIPLE FILES
- PART 3) PHPMAILER LIBRARY
- DOWNLOAD & NOTES
- SUPPORT
- EXAMPLE CODE DOWNLOAD
- EXTRA BITS & LINKS
- LINKS & REFERENCES
- INFOGRAPHIC CHEAT SHEET
- THE END
- Отправка почты средствами PHP
- Attach files in email – PHP
- Attach files in email – PHP
- Getting user input
- Attaching file with email
Send Email With Attachments In PHP (Simple Examples)
Welcome to a tutorial on how to send email attachments in PHP. Looking to send an email with a file attachment in PHP? Well, the native PHP mail function is not the friendliest out of the box.
We have to manually format the email to send attachments with the native PHP mail() function:
- Define a random boundary string – $bound = «RANDOM»;
- Set the boundary in the email header –
- $head = «MIME-Version: 1.0» . «\r\n»;
- $head .= «Content-Type: multipart/mixed; boundary=\»$bound\»»;
- Set the email message.
- $body = «—$bound» . «\r\n»;
- $body .= «Content-type: text/html; charset=utf-8» . «\r\n\r\n»;
- $body . . «\r\n»;
- Manually encode and attach the file.
- $body .= «—$bound» . «\r\n»;
- $body .= «Content-Type: application/octet-stream; name=\»ATTACH.JPG\»» . «\r\n»;
- $body .= «Content-Transfer-Encoding: base64» . «\r\n»;
- $body .= «Content-Disposition: attachment» . «\r\n\r\n»;
- $body .= chunk_split(base64_encode(file_get_contents( «ATTACH.JPG» ))) . «\r\n»;
- $body .= «—$bound—«;
- Send the email out – mail(«TO», «SUBJECT», $body, $head);
That covers the basics, but read on if you need more examples!
TLDR – QUICK SLIDES

TABLE OF CONTENTS
PHP MAIL ATTACHMENT
All right, let us now get into the examples of how to send email attachments in PHP.
PART 1) ATTACH A SINGLE FILE
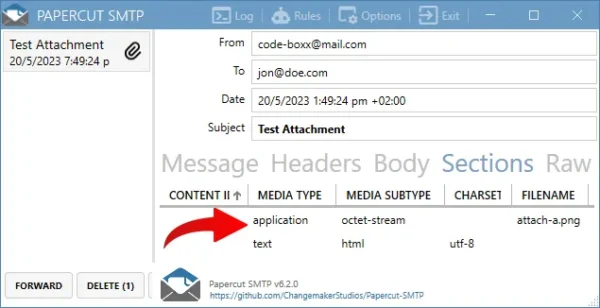
Look no further, this is pretty much just a “polished version” of the introduction snippet. We are just using implode(«\r\n») to quickly build the email header/body here, instead of manually typing out «\r\n» a dozen times.
EXTRA) MANUAL FORMATTING
For you guys who want more technical information – We are formatting the email according to RFC1341 multipart.
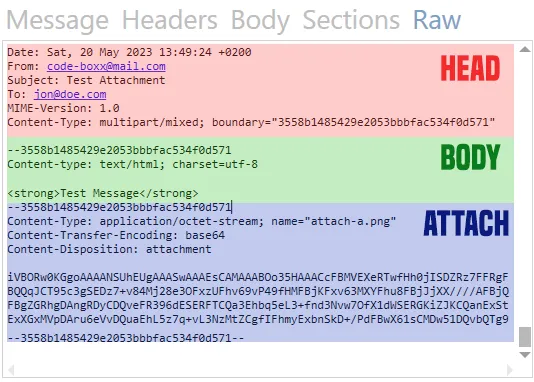
- As in the introduction, we have to define a BOUNDARY string and set it in the email header Content-Type: multipart/mixed; boundary=»BOUNDARY» .
- For each section of the email body:
- Start with —BOUNDARY .
- Followed by the Content-type headings.
- An empty line break, then the content itself.
- Lastly, the email must be closed with —BOUNDARY— .
That’s all. So if you want to add more attachments, it is only a manner of adding more —BOUNDARY segments.
PART 2) ATTACH MULTIPLE FILES
Test Message"; $mailAttach = ["attach-a.png", "attach-b.png"]; // (B) GENERATE RANDOM BOUNDARY TO SEPARATE MESSAGE & ATTACHMENTS // https://www.w3.org/Protocols/rfc1341/7_2_Multipart.html $mailBoundary = md5(time()); $mailHead = implode("\r\n", [ "MIME-Version: 1.0", "Content-Type: multipart/mixed; boundary=\"$mailBoundary\"" ]); // (C) DEFINE THE EMAIL MESSAGE $mailBody = implode("\r\n", [ "--$mailBoundary", "Content-type: text/html; charset=utf-8", "", $mailMessage ]); // (D) MANUALLY ENCODE & ATTACH THE FILES foreach ($mailAttach as $attach) < $mailBody .= implode("\r\n", [ "", "--$mailBoundary", "Content-Type: application/octet-stream; name=\"". basename($attach) . "\"", "Content-Transfer-Encoding: base64", "Content-Disposition: attachment", "", chunk_split(base64_encode(file_get_contents($attach))), "--$mailBoundary" ]); >$mailBody .= "--"; // (E) SEND echo mail($mailTo, $mailSubject, $mailBody, $mailHead) ? "OK" : "ERROR" ; 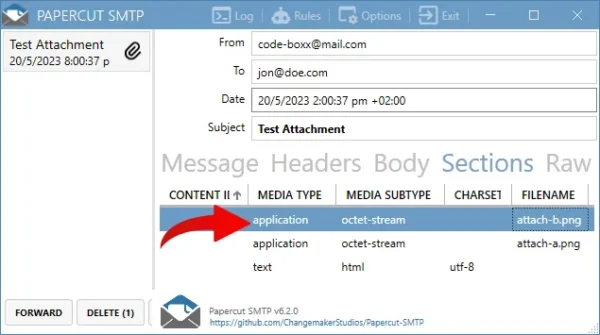
Want to attach many files? Yes, it’s as simple as that – Loop through all the files, add as many —BOUNDARY sections as required.
PART 3) PHPMAILER LIBRARY
From = "you@site.com"; $mail->addAddress("jon@doe.com"); $mail->isHTML(true); $mail->Subject = "Test Attachment"; $mail->Body = "Test Message"; $mail->addAttachment("attach-a.png"); $mail->addAttachment("attach-b.png"); // (C) SEND MAIL try < $mail->send(); echo "OK"; > catch (Exception $ex) < echo $mail->ErrorInfo; >Lastly, if the manual formatting is too much of a hassle, try out the PHPMailer library. This is a popular alternative, and it should not be difficult to see why… The above example should be self-explanatory.
DOWNLOAD & NOTES
Firstly, here is the download link to the example code as promised.
SUPPORT
600+ free tutorials & projects on Code Boxx and still growing. I insist on not turning Code Boxx into a «paid scripts and courses» business, so every little bit of support helps.
EXAMPLE CODE DOWNLOAD
Click here for the source code on GitHub gist, just click on “download zip” or do a git clone. I have released it under the MIT license, so feel free to build on top of it or use it in your own project.
EXTRA BITS & LINKS
That’s all for the main tutorial, and here is a small section on some extras and links that may be useful to you.
LINKS & REFERENCES
INFOGRAPHIC CHEAT SHEET

THE END
Thank you for reading, and we have come to the end. I hope that it has helped you to better understand, and if you want to share anything with this guide, please feel free to comment below. Good luck and happy coding!
Отправка почты средствами PHP
Работая над проектом, мне пришлось создать специфичную «анкету соискателя» в котором надо была отправлять всю анкету на указные за ране e-mail адрес, и я сразу же вспомнил про PHP функцию mail().
bool mail ( string to, string subject, string message [, string additional_headers [, string additional_parameters]]) - E-mail получателя
- Заголовок письма
- Текст письма
- Дополнительные заголовки письма
- Дополнительные параметры командной строки
- true, если письмо было принято к доставке
- false, в противном случае.
Простейший пример
Перейдем к более сложному примеру
Текст письма 1-ая строчка 2-ая строчка '; $headers = "Content-type: text/html; charset=windows-1251 \r\n"; $headers . ; $headers .= "Reply-To: reply-to@example.com\r\n"; mail($to, $subject, $message, $headers); ?> В начале мы определяем кому адресовано письмо, за это отвечает переменная &to, если же получателей несколько человек, то записываем через запятую адреса эл. почты.
Переменные $subject и $message, не буду описывать, это и так понятно.
- В первой строчке ми определяем ты отправляемого письма-HTML и кодировку windows-1251.
- В 2-ом мы указываем от кого пришло письмо.
- В 3-ем указываем e-mail адрес, для ответа на письмо.
А теперь самое интересное отправка письма c вложением (attachment)
$subject = "тема письма"; $message ="Текст сообщения"; // текст сообщения, здесь вы можете вставлять таблицы, рисунки, заголовки, оформление цветом и т.п. $filename = "file.doc"; // название файла $filepath = "files/file.doc"; // месторасположение файла //исьмо с вложением состоит из нескольких частей, которые разделяются разделителем $boundary = "--".md5(uniqid(time())); // генерируем разделитель $mailheaders = "MIME-Version: 1.0;\r\n"; $mailheaders .="Content-Type: multipart/mixed; boundary=\"$boundary\"\r\n"; // разделитель указывается в заголовке в параметре boundary $mailheaders . ; $mailheaders .= "Reply-To: $user_email\r\n"; $multipart = "--$boundary\r\n"; $multipart .= "Content-Type: text/html; charset=windows-1251\r\n"; $multipart .= "Content-Transfer-Encoding: base64\r\n"; $multipart .= \r\n; $multipart .= chunk_split(base64_encode(iconv("utf8", "windows-1251", $message))); // первая часть само сообщение // Закачиваем файл $fp = fopen($filepath,"r"); if (!$fp) < print "Не удается открыть файл22"; exit(); >$file = fread($fp, filesize($filepath)); fclose($fp); // чтение файла $message_part = "\r\n--$boundary\r\n"; $message_part .= "Content-Type: application/octet-stream; name=\"$filename\"\r\n"; $message_part .= "Content-Transfer-Encoding: base64\r\n"; $message_part .= "Content-Disposition: attachment; filename=\"$filename\"\r\n"; $message_part .= \r\n; $message_part .= chunk_split(base64_encode($file)); $message_part .= "\r\n--$boundary--\r\n"; // второй частью прикрепляем файл, можно прикрепить два и более файла $multipart .= $message_part; mail($to,$subject,$multipart,$mailheaders); // отправляем письмо //удаляем файлы через 60 сек. if (time_nanosleep(5, 0)) < unlink($filepath); >// удаление файла Attach files in email – PHP

In this tutorial, we will teach you how you can attach files in an email using PHP. We will be using PHPMailer library to send an email.
Attach files in email – PHP
We will be creating a simple form to enter email address of receiver, subject, message and ability to select a file. That file will be attached in a email and sent to the receiver. If you are testing via XAMPP/WAMP/MAMP you may need to download PHPMailer library from the link below:
You can install the library from composer, all details are provided in the link above. We will be using 2 files, 1 to display a form for input and 2nd to send the mail.
Getting user input
Below is the code for index.php file
Send to:
Subject:
Message:
Select file:
Attaching file with email
Sending email via localhost requires an Gmail account and you need to enable less secure apps for your account. You can enable it from the link below:
Now paste the following code in your send-mail.php file:
SMTPDebug = 0; // Enable verbose debug output $mail->isSMTP(); // Set mailer to use SMTP $mail->Host = 'smtp.gmail.com;'; // Specify main and backup SMTP servers $mail->SMTPAuth = true; // Enable SMTP authentication $mail->Username = 'your_gmail_ID'; // Your gmail address $mail->Password = 'your_gmail_password'; // Your gmail password $mail->SMTPSecure = 'tls'; // Enable TLS encryption, `ssl` also accepted $mail->Port = 587; // TCP port to connect to //Recipients $mail->setFrom('your_gmail_ID', 'your_name'); $mail->addAddress($_POST["receiver"]); $file_name = $_FILES["file"]["name"]; move_uploaded_file($_FILES["file"]["tmp_name"], $file_name); $mail->addAttachment($file_name); // Content $mail->isHTML(true); // Set email format to HTML $mail->Subject = $_POST["subject"]; $mail->Body = $_POST["message"]; $mail->send(); echo 'Message has been sent'; > catch (Exception $e) < echo "Message could not be sent. Mailer Error: ErrorInfo>"; > If you are using Mac, you may need to enable folder permission. You can enable folder permission by following steps below:


Now go ahead and try to submit the form and attaching any file to it. You will have attached file in your inbox (or in your spam if using localhost).
Instead of attaching the file in email, you can also upload the file on your server. And share its download link via an email. Learn here how you can do that.