- CSS Snippets for Creating Responsive HTML Tables
- Horizontal Scrolling
- Collapsible Cells with Repositioned Table Headers
- Static Left Table Headers with Horizontal Scrolling
- Element Queries
- Data Tables jQuery Plugin
- Choosing the Best Technique
- Related Posts
- Related Topics
- How to create responsive tables with pure CSS using Grid Layout Module
- Tables Redefined (= Collection of Items)
- Styling Item Collections
- Styling Step 1: Full Table
- Styling Step 2: Wrapping Table
- Styling Step Three: Card Layout
- Finishing Notes
- CSS Responsive Table
- Example
- More Examples
- CSS Table Properties
- COLOR PICKER
- Report Error
- Thank You For Helping Us!
CSS Snippets for Creating Responsive HTML Tables
The venerable HTML table may (thankfully) be long-dead in terms of its use for page layout. But it’s still going strong with regards to its original intention: displaying tabular data. They’re still incredibly useful and have been enhanced further by the likes of CSS and jQuery.
Still, large tables aren’t always a great experience on mobile screens. If not handled properly, columns can be cut off and thus unreadable. It just makes for a poor UX.
Thankfully there are techniques we can use to make tables more user-friendly on mobile devices. Let’s explore a few approaches we can take to ensure that data is accessible on every screen. We’ll also provide a working example so you can see it in action.
Horizontal Scrolling
Here’s a super easy way to give mobile users access to a very wide table. Adding a container element with the overflow-x property set to auto will allow for horizontal scrolling on small screens. Not necessarily the most elegant way to do things, but at least the content is accessible. Special thanks to W3 Schools for the concept.
See the Pen Simple Responsive Table by Eric Karkovack
Collapsible Cells with Repositioned Table Headers
This method is a little bit more user-friendly than scrolling, albeit more difficult to set up. On mobile screens, each td cell is displayed as a block , thus stacking them on top of each other. Then, using some trickery with the data-th attribute and the :before CSS selector, tables headers are essentially moved from the top row over to the left.
See the Pen Responsive Table by Geoff Yuen
Below is a slightly different take on this option. Rather than using the data-th attribute, table header items are defined via the CSS content property. While the effect is essentially the same, the requirements for maintaining code are different. This solution is probably better for smaller sites that don’t contain many tables.
Static Left Table Headers with Horizontal Scrolling
Here we see a table header ( thead ) that is setup to float:left via CSS and remain statically positioned on small screens. Rows of data are converted into columns, making for a nicely-organized table. A bit of JavaScript is used to keep the table headers the same height and alignment as the other cells.
See the Pen Responsive Tables by Jason Gross
Element Queries
Element queries focus on the sizing requirements of specific elements rather than on just the dimensions of a browser window. They’re experimental at this point, but you can read more about them at EQCSS (which also offers a JS library to utilize). In the following table example, the td cells are arranged in various column layouts. The whole thing is based on the width of table elements. This is definitely an interesting technique worth keeping an eye on.
See the Pen Responsive Tables: Grid Layout by Tommy Hodgins
Data Tables jQuery Plugin
The Data Tables jQuery plugin adds all kinds of useful functionality to standard HTML tables. And its responsive abilities are quite amazing. The script will automatically hide columns based upon screen size. The hidden data is available for viewing with a click (or touch). You also have the flexibility to give priority to specific columns. The example below shows a responsive table in all its glory.
Choosing the Best Technique
The techniques above are really just a small sampling of what developers are doing with responsive tables. They range from extremely simple all the way to complicated, script-dependent concoctions.
When it comes to picking the right solution for your project, it really comes down to a few factors:
- Consider the size of the tables you’ll create and what type of data they’ll contain.
- Determine what dependencies you are comfortable with.
- Think about the potential for automating the whole process.
If you’re building a relatively small website that will only contain a table or two, then future maintenance might not be a big concern. But with larger sites, you’ll want to think of ways to keep everything running smoothly as new tables are added, and existing ones are changed.
For example, using a method that pulls information from a data attribute can be really effective – but also potentially difficult to maintain. This is especially so if a non-designer will be responsible for adding content. In that case, it would be worthwhile to try and automate the process of creating data attributes through PHP or other code. That way, the person responsible for content doesn’t have to worry about dealing with code.
Tables present a unique challenge for designers. They were imagined long before the mobile web came into existence. But with a little creativity, you can build a great user experience – even on the smallest of screens.
Related Posts
Related Topics
This page may contain affiliate links. At no extra cost to you, we may earn a commission from any purchase via the links on our site. You can read our Disclosure Policy at any time.
How to create responsive tables with pure CSS using Grid Layout Module
The most popular way to display a collection of similar data is to use tables, but HTML tables have the drawback of being difficult to make responsive.
In this article, I use CSS Grid Layout Module and CSS Properties (and no Javascript) to layout tables that wrap columns depending on screen width, which further changes to a card based on layout for small screens.
For the impatient, look at the following pen for a prototypical implementation.

An item, in this case, is a purchase order detail, that has attributes such as part number, part description, etc.
Tables Redefined (= Collection of Items)
Let’s start by redefining how table data should be expressed in HTML.
As stated earlier, since table data is essentially an ordered collection of items, it seems natural to use ordered lists. Also, since tables are often used to supplement textual descriptions, it seems natural to enclose this in a section, but this would depend on the context of how the table data is being used.
Vanilla ‘s are used to express item attributes since HTML5 does not define an appropriate tag for this. The key here is to express semantically similar attributes as a hierarchy of ‘s. This structure will be used when defining how the data should be laid out. I will come back to this in the next section on the topic of styling.
As for the actual data inside the element, the first item in the list is the header, and the rest of the items are the actual data.
Now, it’s time to start talking about styling the items with CSS Grid.
Styling Item Collections
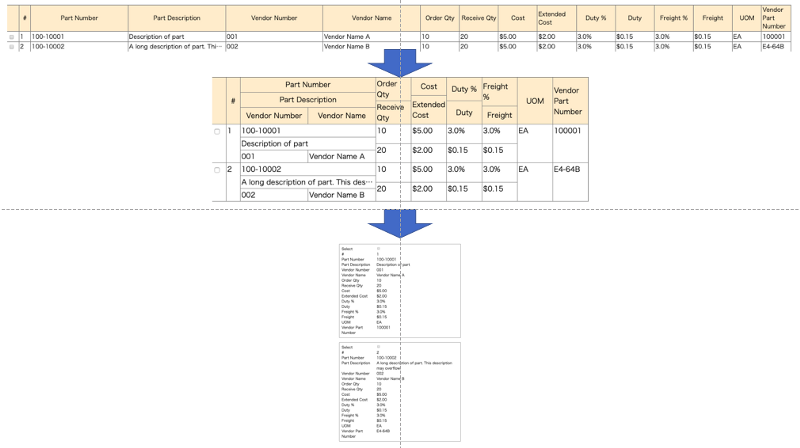
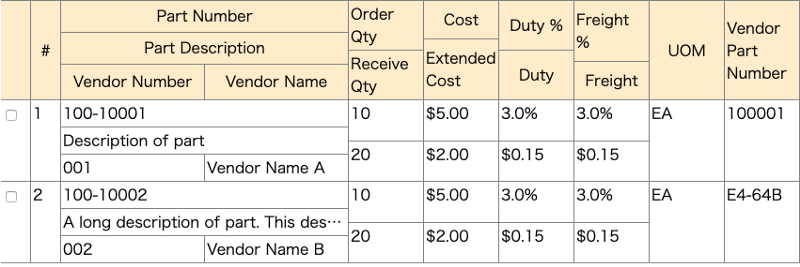
The basic idea here is to display all attributes of the item as a normal table, display width permitting. This layout has the luxury of being able to see as many items (rows) as possible.
![]()
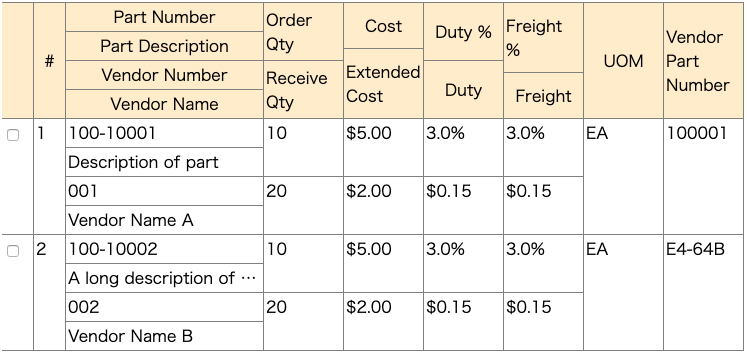
When the width of the display becomes narrower, some attributes are stacked vertically, in order to save horizontal space. The choice of stacking attributes should be based on:
- Do the attributes make sense when stacked vertically? and,
- When stacked vertically, does it save horizontal space?


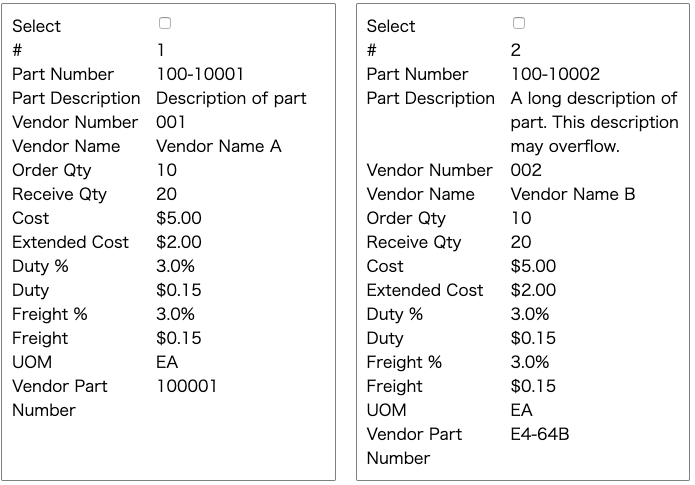
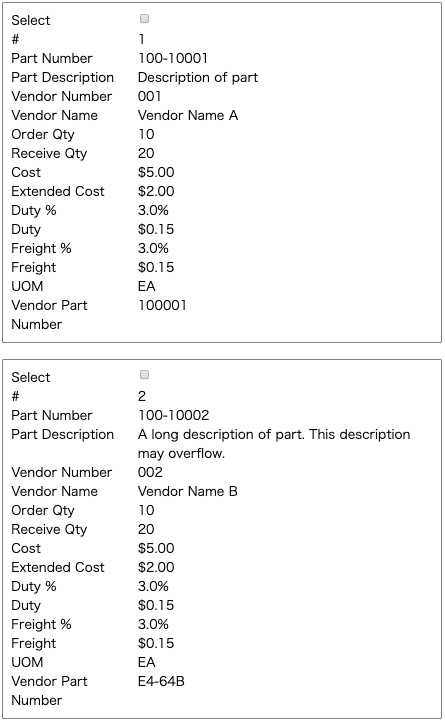
When the width further shrinks to the size of a mobile device, each item is displayed as a card. This layout has redundancy because the attribute names are repeatedly displayed on each card, and has the least glanceability, but does not compromise usability (e.g. horizontal scrolling, super small text, etc).
Now let’s dive into the details.
Styling Step 1: Full Table
Here’s a visual summary of how things will be implemented with CSS Grid.
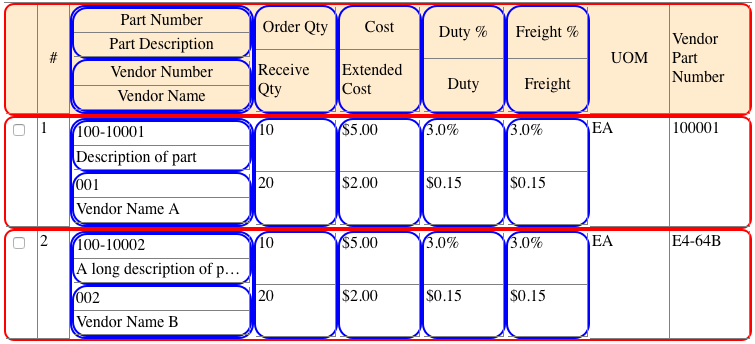
In order to make columns wrap, multiple grid containers are defined as a hierarchy. The red box is a grid container for each row, and the blue box is a container for each column group that wraps.
The column’s width is defined in relative length to make the columns wrap. The actual fraction has to be fine-tuned, based on the content.
The columns that don’t wrap are defined in absolute length to maximize width usage for the wrapping columns. In the purchase order details example, the second column is a two-digit Id, so I set the width to double that size of 2 m’s.
Next, we define another grid container called .attribute-container and apply it on all intermediate ’s under the list (the blue box).
The minimum column width for all grid items under .attribute-container is specified with a CSS variable called —column-width-min (more on this later) using the minmax function, with the maximum set to take the rest of the space (e.g. one fraction). Since grid-template-columns are repeat ed, available horizontal space will be split into the maximum number of columns that could take at least —column-width-min , and the rest of the columns would go to the next line. The column’s width will be stretched if there is excess horizontal space because the repeat is auto-fit ed.
Styling Step 2: Wrapping Table
Next, —column-width-min needs to be specified independently for each column in order to wrap. Just to be clear, the variables need to be specified in order for the full table to render properly as well. To do this, a class is set for each .attribute-container , and a different —column-width-min is specified for each class scope.
Let’s take a look at the HTML where .part-id is applied,
Part Number Part Description This specific grid container will have two columns, as long as the available width is wider than 10em for each grid item (e.g. the grid container is wider than 20em). Once the grid container’s width becomes narrower than 20em, the second grid item will go to the next row.
When we combine CSS properties like this, we need only one grid container .attribute-container , with the details changing where the class is applied.
We can further nest .attribute-container s, to have multiple levels of wrapping with different widths, as in the following exert.
.part-information < --column-width-min: 10em; >.part-id < --column-width-min: 10em; >.vendor-informationPart NumberPart DescriptionVendor NumberVendor Name
All of the above is enclosed in the following media query. The actual breakpoint should be selected based on the width necessary when your table is wrapped to the extreme.
@media screen and (min-width: 737px)
Styling Step Three: Card Layout
The card layout will look like a typical form with attribute names in the first column and attribute values in the second column.
The attribute names are taken from a custom attribute of the leaf called data-name , for example , and a pseudo-element is created. The pseudo-element will be subject to the grid container’s layout.
The first item in the list is the header and does not need to be displayed.
/* Don't display the first item, since it is used to display the header for tabular layouts*/ .collection-container>li:first-child
And finally, the cards are laid out in one column for mobile devices, but two for screens with a little bit more width, but not enough for displaying a table.
/* 2 Column Card Layout */ @media screen and (max-width: 736px) < .collection-container < display: grid; grid-template-columns: 1fr 1fr; grid-gap: 20px; >. > /* 1 Column Card Layout */ @media screen and (max-width:580px) < .collection-container < display: grid; grid-template-columns: 1fr; >>Finishing Notes
Accessibility is an area that wasn’t considered at all and may have some space for improvement.
If you have any ideas or second thoughts, please feel free to comment!
And of course, thanks for reading.
CSS Responsive Table
A responsive table will display a horizontal scroll bar if the screen is too small to display the full content:
| First Name | Last Name | Points | Points | Points | Points | Points | Points | Points | Points | Points | Points | Points | Points |
|---|---|---|---|---|---|---|---|---|---|---|---|---|---|
| Jill | Smith | 50 | 50 | 50 | 50 | 50 | 50 | 50 | 50 | 50 | 50 | 50 | 50 |
| Eve | Jackson | 94 | 94 | 94 | 94 | 94 | 94 | 94 | 94 | 94 | 94 | 94 | 94 |
| Adam | Johnson | 67 | 67 | 67 | 67 | 67 | 67 | 67 | 67 | 67 | 67 | 67 | 67 |
Example
Note: In OS X Lion (on Mac), scrollbars are hidden by default and only shown when being used (even though «overflow:scroll» is set).
More Examples
Make a fancy table
This example demonstrates how to create a fancy table.
Set the position of the table caption
This example demonstrates how to position the table caption.
CSS Table Properties
| Property | Description |
|---|---|
| border | Sets all the border properties in one declaration |
| border-collapse | Specifies whether or not table borders should be collapsed |
| border-spacing | Specifies the distance between the borders of adjacent cells |
| caption-side | Specifies the placement of a table caption |
| empty-cells | Specifies whether or not to display borders and background on empty cells in a table |
| table-layout | Sets the layout algorithm to be used for a table |

COLOR PICKER


Report Error
If you want to report an error, or if you want to make a suggestion, do not hesitate to send us an e-mail:
Thank You For Helping Us!
Your message has been sent to W3Schools.
Top Tutorials
Top References
Top Examples
Get Certified
W3Schools is optimized for learning and training. Examples might be simplified to improve reading and learning. Tutorials, references, and examples are constantly reviewed to avoid errors, but we cannot warrant full correctness of all content. While using W3Schools, you agree to have read and accepted our terms of use, cookie and privacy policy.