- Install and configure Apache and php with mod fastcgi on Ubuntu/Debian
- Install the packages
- Configure fastcgi
- Wrapper script
- Resource
- 4 Comments
- How to Setup Apache with PHP/FastCGI on CentOS/RHEL 7/6
- Step 1 – Prerequsitis
- Step 2 – Install Apache2
- Step 3 – Install PHP and FastCGI
- Step 4 – Disable Default PHP Handler
- Step 5 – Setup FastCGI Handler
- Step 6 – Setup VirtualHost with FastCGI
- Step 7 – Restart Apache and Test Setup
- How to Install Apache with PHP-FPM on Ubuntu 20.04
- Step 1 – Installing Apache
- Step 2 – Install PHP with FPM
- Step 3 – Apache Configuration
Install and configure Apache and php with mod fastcgi on Ubuntu/Debian
Mod_fastcgi is an apache module that enables apache to talk to fastcgi enabled applications. It can be used to run php code over fastcgi through the php-cgi binary which is fastcgi enabled.
Fastcgi has many improvements over the traditional cgi model of executing external programs inside a webserver. With fastcgi multiple processes are kept alive and each process is reused to serve multiple requests one after another. There are settings to control the maximum number of requests a process can serve, after which the process is terminated and a new one is started.
Install the packages
The first thing to do is install the necessary packages from synaptic. We need to install the apache server, mod_fastcgi, mpm worker and php along with the cgi binary. Note that if you already have php installed with mpm prefork and mod-php then it would be removed upon installing these packages
$ sudo apt-get install apache2 libapache2-mod-fastcgi apache2-mpm-worker php5 php5-cgi
On ubuntu the apache configuration file located at
/etc/apache2/sites-enabled/000-default
The php cgi binary is located at /usr/bin/php-cgi.
Configure fastcgi
After installing the packages, its time to configure apache to use mod_fastcgi to run php scripts. Like cgi, fastcgi will also run php processes using the php-cgi binary.
First enable the fastcgi module with a2enmod command
The a2enmod command copies the configuration file of the module from /etc/apache2/mods-available to the directory /etc/apache2/mods-enabled. The configuration file in this case is fastcgi.conf. It looks like this
AddHandler fastcgi-script .fcgi FastCgiIpcDir /var/lib/apache2/fastcgi
Mod_fastcgi registers a handler called fastcgi-script with apache. This can be used to specify which programs to execute through mod_fastcgi.
Ok, lets move on. Next thing is to configure the relevant vhost to run php using the fastcgi handler. Put the following configuration inside the desired vhost block in the apache configuration file.
FastCgiServer /usr/local/bin/php-fastcgi-wrapper -processes 10 -restart-delay 1 -init-start-delay 1 -pass-header HTTP_AUTHORIZATION Alias /binary /usr/local/binOptions ExecCGI SetHandler fastcgi-script AddHandler php-fastcgi .php Action php-fastcgi /binary/php-fastcgi-wrapper
The FastCgiServer registers /usr/local/bin/php-fastcgi-wrapper as the fastcgi application with various options.
Note that this is a shell script that will launch the php-cgi binary with various settings. Note that we asked the FastCgiServer to create and manage 10 processes.
The AddHandler line declares a new handler for «.php» files called php-fastcgi. This can named to anything you like.
The Action line tells apache to handle php-fastcgi file using the cgi program /cgi-bin/php-fastcgi-wrapper.
Now the location /cgi-bin/php-fastcgi-wrapper is not a real one. To make it point to the real location of wrapper script, the Alias directive is used. It points /cgi-bin to /usr/local/bin.
Wrapper script
Now comes the wrapper script that will be used by fastcgi to run php.
#!/bin/sh # Set desired PHP_FCGI_* environment variables. # Example: # PHP FastCGI processes exit after 500 requests by default. PHP_FCGI_MAX_REQUESTS=10000 export PHP_FCGI_MAX_REQUESTS PHP_FCGI_CHILDREN=5 export PHP_FCGI_CHILDREN # Replace with the path to your FastCGI-enabled PHP executable exec /usr/bin/php-cgi
Note the PHP_FCGI_CHILDREN setting. It specifies that each php process should further fork and manage 5 more child php processes. So earlier fastcgi was told to create 10 processes. The total is 10*5 = 50 processes. There are 2 levels of process management going on. Mod_fastcgi manages 10 php processes and each php process further manages 5 process each.
This file is stored at the following path
/usr/local/bin/php-fastcgi-wrapper
Make sure that the file is executable. Do a chmod on it
/usr/local/bin# chmod +x php-fastcgi-wrapper
The location of the file does not matter. The wrapper script is necessary so that various options like PHP_FCGI_MAX_REQUESTS can be passed on to the php process.
Now restart apache and test the setup by opening a php script in browser. View the contents of the $_SERVER variable in php. It should contain [FCGI_ROLE] => RESPONDER. This indicates that fastcgi is in action.
Also check the process table using htop or System Monitor. You should see 50 php-cgi processes running.
Resource
A Tech Enthusiast, Blogger, Linux Fan and a Software Developer. Writes about Computer hardware, Linux and Open Source software and coding in Python, Php and Javascript. He can be reached at [email protected] .
4 Comments
- tylercollier July 25, 2014 at 11:11 pm My previous comment about “client denied by server configuration: /usr/local/bin/php-fastcgi-wrapper” has not yet been approved, so I can’t see, edit, or reply to it. But I wanted to post my fix. From: http://stackoverflow.com/a/13923526/135101. Add [Directory /usr/local/bin]
Require all granted
[/Directory] to your vhost config. EDIT: I guess I can’t use markdown here and Disqus is munging my “html” of the directory element, so I replaced angle brackets with brackets.
- tylercollier July 25, 2014 at 11:11 pm I had to enable the multiverse source, but only from Ubuntu 14.04 (see instructions here: http://serversforhackers.com/articles/2014/05/05/apache-proxy-fcgi/. I just needed the section labeled Ubuntu 14.04). I didn’t on 12.04. I also had to run `sudo a2enmod actions`.
How to Setup Apache with PHP/FastCGI on CentOS/RHEL 7/6
FastCGI functionality is very similar to working of CGI. FastCGI makes differences at few places than CGI like FastCGI processes are persistent and they can handle more than one request per process. FastCGI allows running programs on remote machines by multiplexes the environment information, standard input, output and error over a single full-duplex connection. Read more about FastCGI.
This tutorial will help you to set up Apache webserver with PHP and FastCGI on RedHat based systems.
Step 1 – Prerequsitis
Fast of all, enable REMI and EPEL yum repositories on your system. These repositories provide the lastest packages for RedHat based systems.
Step 2 – Install Apache2
Apache2 packages are available with the name HTTPD for Redhat based systems. You can use the following commands to install the latest available Apache2 (HTTPD) packages in configured repositories on your system.
Step 3 – Install PHP and FastCGI
After installing the Apache web server, let’s install PHP and FastCGI Apache module on your system. You can install any version of the required PHP or simply use the following command to install available PHP packages. This tutorial doesn’t include installing PHP modules, So you can also install required PHP modules.
yum install php php-cli mod_fcgid
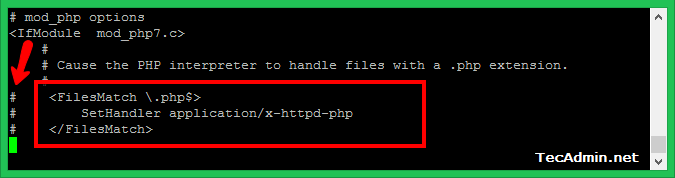
Step 4 – Disable Default PHP Handler
Before using PHP/FastCGI handler, you have to disable the default PHP handler on your system. Edit PHP configuration file for Apache (/etc/httpd/conf.d/php.conf) in your favorite text editor and comment following lines showing in below screenshot by adding the hash (#) sign at the start of the lines.
Step 5 – Setup FastCGI Handler
At this point we have successfully installed Apache FastCGI Module. Now nagigate to /var/www/cgi-bin directory, If not exists create directory. Then create a php.fastcgi file and add the following content to this file. Also make sure the php.ini file and php-cgi exist on your system.
vim /var/www/cgi-bin/php.fastcgi
#!/bin/bash PHPRC="/etc/php.ini" PHP_FCGI_CHILDREN=4 PHP_FCGI_MAX_REQUESTS=1000 export PHPRC export PHP_FCGI_CHILDREN export PHP_FCGI_MAX_REQUESTS exec /usr/bin/php-cgi
Change permissions of php.fastcgi script to make it executable by Apache server.
chown apache:apache /var/www/cgi-bin/php.fastcgi chmod +x /var/www/cgi-bin/php.fastcgi
Step 6 – Setup VirtualHost with FastCGI
Finally, create a VirtualHost in our Apache configuration file with FastCGI support. VirtualHosts are used to configure multiple sites with a single IP. Below configuration will allow siting svr1.tecadmin.net with any system IP on port 80.
ServerName svr1.tecadmin.net ServerAdmin [email protected] DocumentRoot /var/www/html ScriptAlias /cgi-bin/ "/var/www/cgi-bin/" Options +Indexes +FollowSymLinks +ExecCGI AddHandler php-fastcgi .php Action php-fastcgi /cgi-bin/php.fastcgi AllowOverride All Order allow,deny Allow from All
Step 7 – Restart Apache and Test Setup
At this point, you have completed the Apache configuration with FastCGI support. Let’s restart the Apache server using the following command.
Now create a file in your document root /var/www/html/info.php and add following content to check detailed php information.
How to Install Apache with PHP-FPM on Ubuntu 20.04
PHP FPM (FastCGI Process Manager) is an alternative implementation of PHP FastCGI. It provides some additional features like Adaptive process spawning which is useful for sites. This tutorial will help you to install Apache with PHP-FPM/FastCGI on Ubuntu 20.04 system. In this tutorial, we are using PHP 7.4 and configure with Apache using PHP-FPM and FastCGI.
You can also visit the previous tutorial to configure Apache with multiple PHP versions using PHP-FPM/FastCGI on Ubuntu systems.
Step 1 – Installing Apache
Apache web server debian packages are available under the default repositories. Login to your Ubuntu system with sudo privileges account. Open a terminal and execute the following commands:
sudo apt update sudo apt install apache2 libapache2-mod-fcgid
The above commands will install Apache and FastCGI module to your server.
Step 2 – Install PHP with FPM
Next, install PHP and PHP-FPM on your Ubuntu system. For this tutorial, we choose PHP 7.4 to install using
For the PHP installation we recommend to use ppa:ondrej/php PPA. Execute below couple of commands to add the PPA to your system.
sudo apt install software-properties-common sudo add-apt-repository ppa:ondrej/php
Then install PHP 7.4 (or required version) the latest version available on the day of writing this tutorial. Simply execute follows commands for the installation of PHP and PHP-FPM packages.
sudo apt update sudo apt install php7.4 php7.4-fpm
Note:- When you are using PHP-FPM. All the PHP modules configurations are residing under /etc/php/7.4/fpm directory. You can read more about enable/disable PHP modules.
After installing the packages php7.4-fpm service will automatically be started. To make sure, type:
sudo systemctl status php7.4-fpm ● php7.4-fpm.service - The PHP 7.4 FastCGI Process Manager Loaded: loaded (/lib/systemd/system/php7.4-fpm.service; enabled; vendor preset: enabled) Active: active (running) since Sat 2020-05-09 04:41:44 UTC; 19s ago Docs: man:php-fpm7.4(8) Process: 375077 ExecStartPost=/usr/lib/php/php-fpm-socket-helper install /run/php/php-fpm.sock /etc/php/7.4/fpm/pool.d/www.conf 74 (code=exited> Main PID: 375073 (php-fpm7.4) Status: "Processes active: 0, idle: 2, Requests: 0, slow: 0, Traffic: 0req/sec" Tasks: 3 (limit: 2283) Memory: 9.3M CGroup: /system.slice/php7.4-fpm.service ├─375073 php-fpm: master process (/etc/php/7.4/fpm/php-fpm.conf) ├─375075 php-fpm: pool www └─375076 php-fpm: pool www May 09 04:41:43 tecadmin systemd[1]: Starting The PHP 7.4 FastCGI Process Manager. May 09 04:41:44 tecadmin systemd[1]: Started The PHP 7.4 FastCGI Process Manager.
Step 3 – Apache Configuration
Now, You need to enable some of the Apache modules required for the FastCGI confiugration. You can enable the requird module by running command:
sudo a2enmod actions fcgid alias proxy_fcgi
Then configure Apache Virtual Host to run with FPM/FastCGI. For this tutorial, we use default VirtualHost. Edit VirtualHost host configuration file in a text editor. You can also create a new configuration as per your choice.
sudo vim /etc/apache2/sites-available/000-default.conf
Update the configuration as followings.