- Installing LAMP Stack with MariaDB on Ubuntu 23.04
- Install Apache
- Enable Firewall
- Install MariaDB Server
- LAMP, install Apache, MariaDB and PHP on Ubuntu 20.04
- Install LAMP on Ubuntu 20.04
- Install Apache web server
- Install the MariaDB database server
- Install PHP7.4
- Run PHP-FPM with Apache
- 6 comments, leave yours
- Leave a Comment Cancel reply
Installing LAMP Stack with MariaDB on Ubuntu 23.04

A LAMP stack is a group of open-source software that is typically installed together to enable a server to host dynamic websites and web apps. This term is actually an acronym which represents the Linux operating system, with the Apache web server. The site data is stored in a MySQL or MariaDB database, and dynamic content is processed by PHP.
First, check for any pending system upgrades.
Install Apache
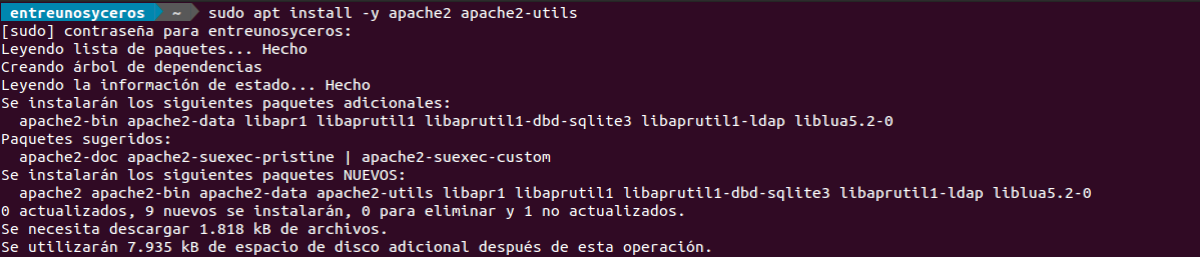
Command to install Apache along with its utilities.
apt install -y apache2 apache2-utilsNext, check the Status of Apache.
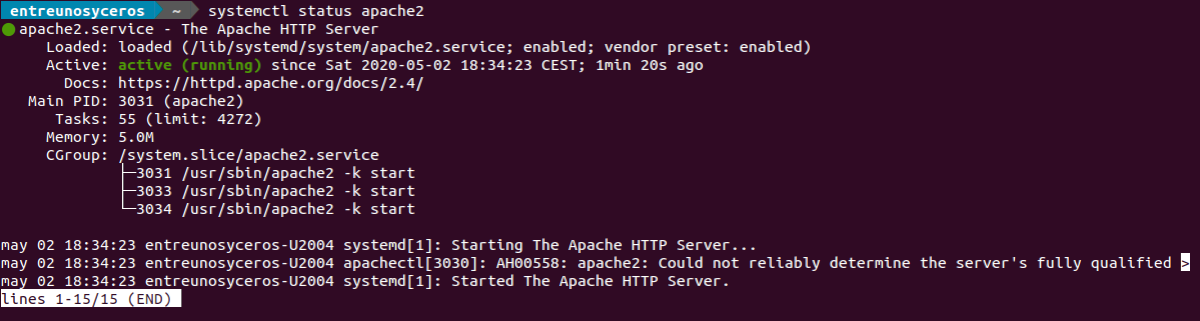
root@ubuntu:~# systemctl status apache2 ● apache2.service - The Apache HTTP Server Loaded: loaded (/lib/systemd/system/apache2.service; enabled; preset: enab> Active: active (running) since Fri 2023-04-14 15:36:54 UTC; 3min 6s ago Docs: https://httpd.apache.org/docs/2.4/ Main PID: 2067 (apache2) Tasks: 55 (limit: 3386) Memory: 5.1M CPU: 191ms CGroup: /system.slice/apache2.service ├─2067 /usr/sbin/apache2 -k start ├─2068 /usr/sbin/apache2 -k start └─2070 /usr/sbin/apache2 -k start If Apache is not active can start using the following command.
Use the following command to auto start Apache at boot time.
You can confirm the Apache2 version with the below command,
root@ubuntu:~# apache2 -v Server version: Apache/2.4.55 (Ubuntu) Server built: 2023-03-08T16:32:34 Enable Firewall
We will open the HTTP port in the firewall, so we can access the page served by the Apache web server.
Allow the HTTP port by running the below command,
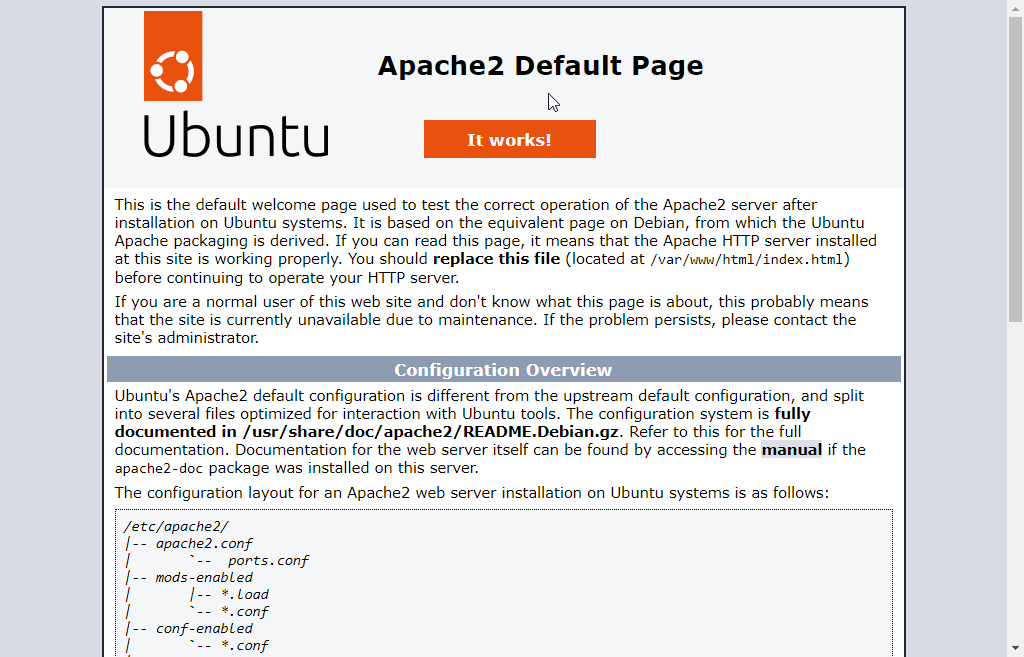
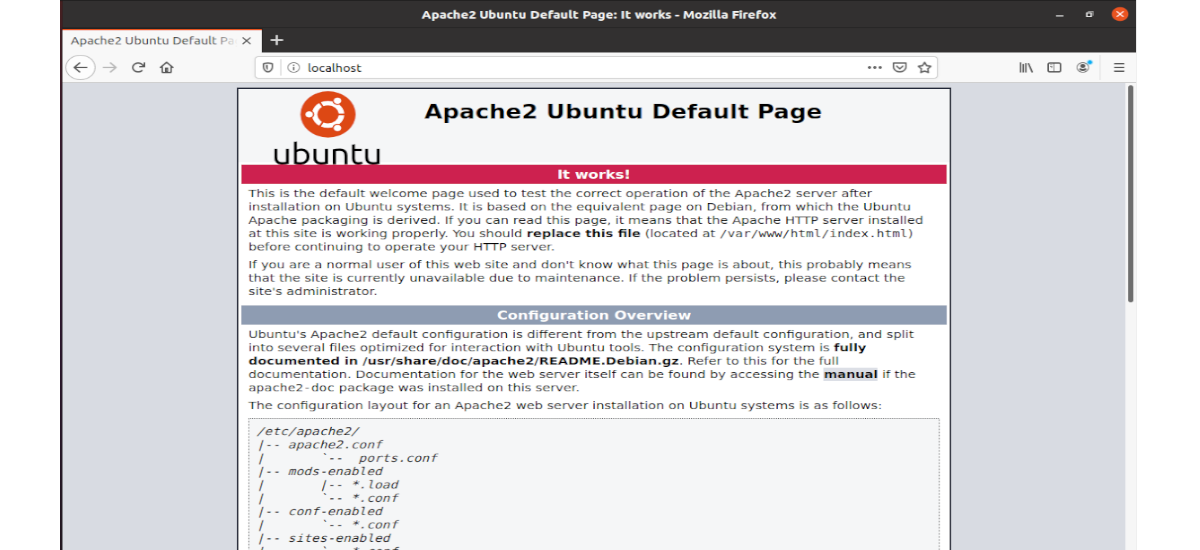
Rules updated Rules updated (v6)And to verify if it’s working, open the server’s IP address in your browser. You should be able to view the Apache default page.
NOTE: Replace with your Server IP address.
Install MariaDB Server
Install MariaDB server, run the below command:
apt install mariadb-server mariadb-clientOnce the installation complete, check the status of MariaDB.
root@ubuntu:~# systemctl status mariadb ● mariadb.service - MariaDB 10.11.2 database server Loaded: loaded (/lib/systemd/system/mariadb.service; enabled; preset: enab> Active: active (running) since Fri 2023-04-14 18:11:18 UTC; 22s ago Docs: man:mariadbd(8) https://mariadb.com/kb/en/library/systemd/ Main PID: 4880 (mariadbd) Status: "Taking your SQL requests now. " Tasks: 17 (limit: 3386) Memory: 79.2M CPU: 1.439s CGroup: /system.slice/mariadb.service └─4880 /usr/sbin/mariadbd Start MariaDB if it is not active using below command,
Use the following command to auto start MariaDB at boot time.
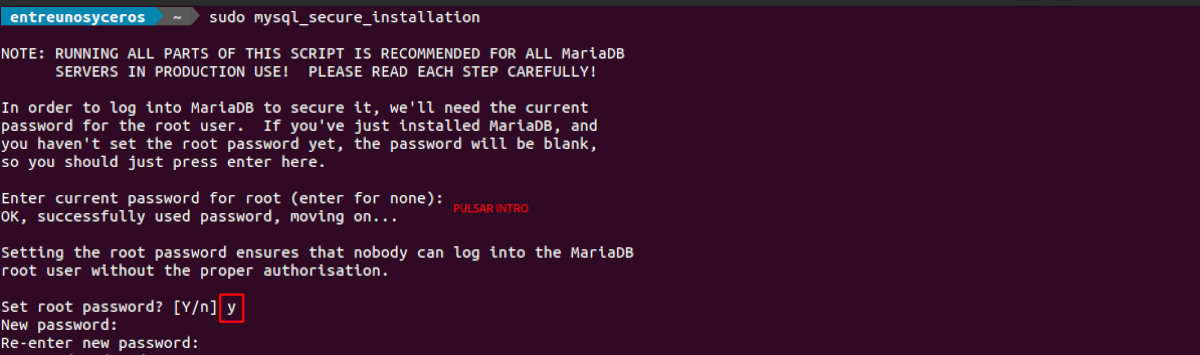
Next, MariaDB database security.
NOTE: In this step, you will be prompted with several questions.
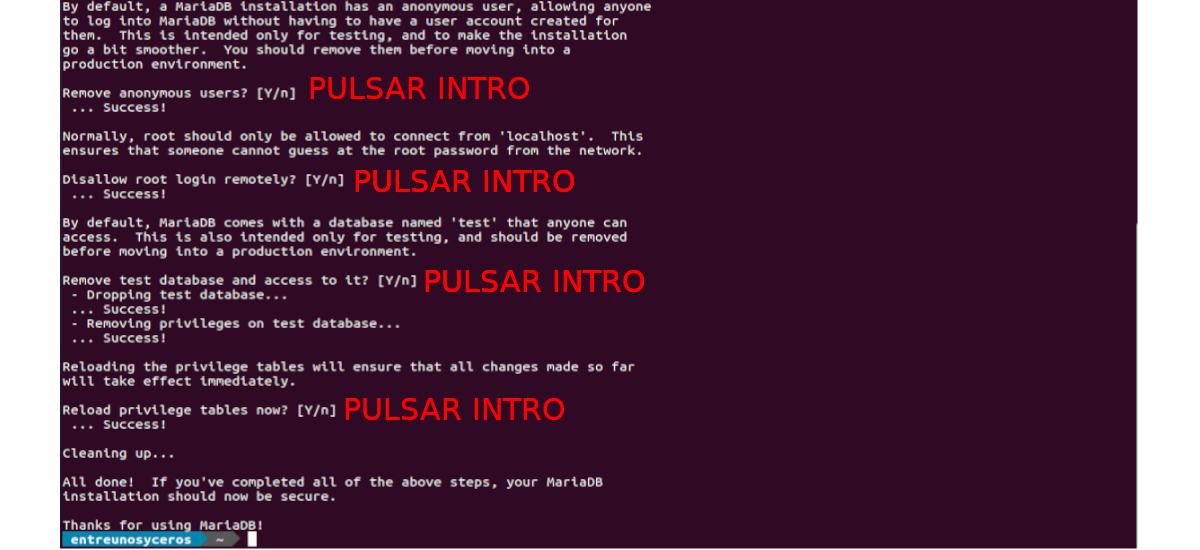
mysql_secure_installationroot@ubuntu:~# mysql_secure_installation NOTE: RUNNING ALL PARTS OF THIS SCRIPT IS RECOMMENDED FOR ALL MariaDB SERVERS IN PRODUCTION USE! PLEASE READ EACH STEP CAREFULLY! In order to log into MariaDB to secure it, we'll need the current password for the root user. If you've just installed MariaDB, and haven't set the root password yet, you should just press enter here. Enter current password for root (enter for none): OK, successfully used password, moving on. Setting the root password or using the unix_socket ensures that nobody can log into the MariaDB root user without the proper authorisation. You already have your root account protected, so you can safely answer 'n'. Switch to unix_socket authentication [Y/n] y Enabled successfully! Reloading privilege tables.. . Success! You already have your root account protected, so you can safely answer 'n'. Change the root password? [Y/n] y New password: Re-enter new password: Password updated successfully! Reloading privilege tables.. . Success! By default, a MariaDB installation has an anonymous user, allowing anyone to log into MariaDB without having to have a user account created for them. This is intended only for testing, and to make the installation go a bit smoother. You should remove them before moving into a production environment. Remove anonymous users? [Y/n] y . Success! Normally, root should only be allowed to connect from 'localhost'. This ensures that someone cannot guess at the root password from the network. Disallow root login remotely? [Y/n] y . Success! By default, MariaDB comes with a database named 'test' that anyone can access. This is also intended only for testing, and should be removed before moving into a production environment. Remove test database and access to it? [Y/n] y - Dropping test database. . Success! - Removing privileges on test database. . Success! Reloading the privilege tables will ensure that all changes made so far will take effect immediately. Reload privilege tables now? [Y/n] y . Success! Cleaning up. All done! If you've completed all of the above steps, your MariaDB installation should now be secure. Thanks for using MariaDB! Login to the MariaDB using below command,
LAMP, install Apache, MariaDB and PHP on Ubuntu 20.04

In the following article we are going to take a look at how we can install LAMP on Ubuntu 20.04 LTS. It is a bundled set of software tools. LAMP stands for Linux, Apache, MariaDB / MySQL and PHP, all of which are open source and free to use. It is the most common software stack that powers dynamic websites and web applications.
Linux is the operating system, Apache is the web server, MariaDB / MySQL is the database server, and PHP is the server-side scripting language responsible for generating dynamic web pages. To follow the following lines it will be necessary to have an operating system Ubuntu 20.04 running on a local machine or on a remote server.
Install LAMP on Ubuntu 20.04
Before installing the LAMP stack, it is a good idea update the repository and available software packages. We will do this by executing in a terminal (Ctrl + Alt + T):
sudo apt update; sudo apt upgrade
Install Apache web server
Type the following command in a terminal (Ctrl + Alt + T) to install Apache web server:
sudo apt install -y apache2 apache2-utils
Once installed, Apache should start automatically. We can verify this by writing:
We can also check Apache version:

Now type the public IP address of the Ubuntu 20.04 server in the address bar of the browser. You should see the start web page, which means that the Apache web server is running correctly. If you are installing LAMP on a local Ubuntu 20.04 machine, type 127.0.0.1 or localhost in the address bar browser.
If the connection is refused or does not complete, we may have a firewall preventing incoming requests to TCP port 80. If you are using the iptables firewall, you must run the following command to open TCP port 80:
sudo iptables -I INPUT -p tcp --dport 80 -j ACCEPT
If you are using the firewall UFW, execute the command to open TCP port 80:
Now we need set www-data (Apache user) as the owner of the web root. We will achieve this by writing:
sudo chown www-data:www-data /var/www/html/ -R
Install the MariaDB database server
MariaDB is a direct replacement for MySQL. Write the following command to to install MariaDB on Ubuntu 20.04:

sudo apt install mariadb-server mariadb-client
After it is installed, the MariaDB server should run automatically. We will can check your status with the command:

If it is not running, we will start it by writing:
sudo systemctl start mariadb
To withdraw from your allow MariaDB to start automatically at boot time, we must execute:
sudo systemctl enable mariadb
Check the MariaDB server version:

Now run the post-install security script:
sudo mysql_secure_installation
When you ask us to enter the MariaDB root password, pulsa Intro since the root password is not set yet. Then enter your root password for the MariaDB server.
Now, we can press Intro to answer all the remaining questions. This will remove the anonymous user, disable remote root login, and remove the test database.
Default, the MaraiDB package in Ubuntu uses unix_socket to authenticate user login.
Install PHP7.4
At the time of writing this article, PHP7.4 is the latest stable version of PHP. For this we are going to write the following command to install PHP7.4 and some common PHP modules:

sudo apt install php7.4 libapache2-mod-php7.4 php7.4-mysql php-common php7.4-cli php7.4-common php7.4-json php7.4-opcache php7.4-readline
Now we will have to activate Apache php7.4 module and restart Apache web server.

sudo a2enmod php7.4 sudo systemctl restart apache2
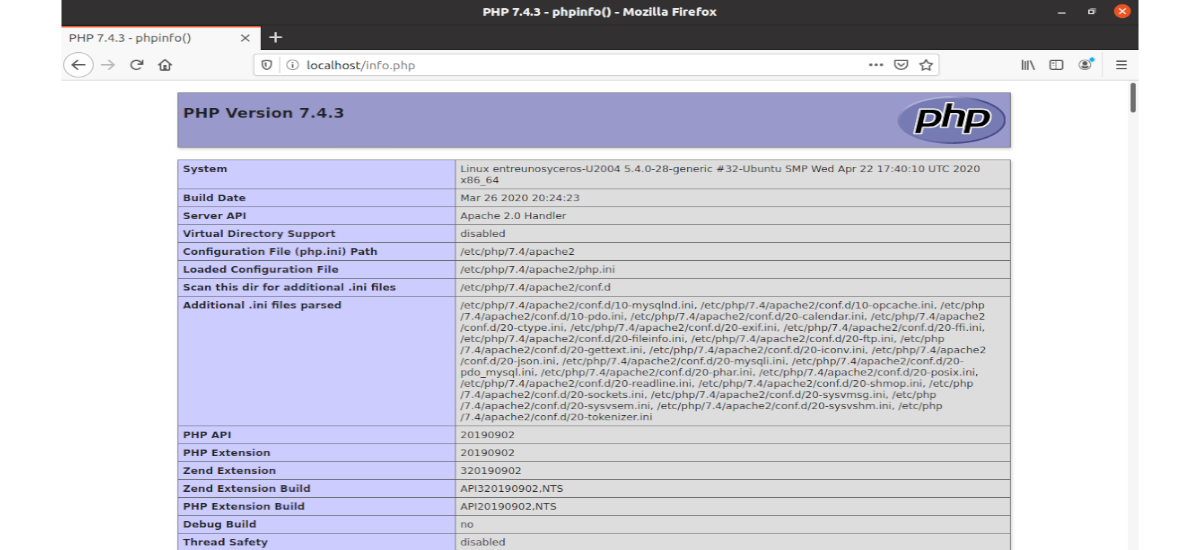
We can check PHP version with the command:

To test the PHP scripts with the Apache server, we need to create an info.php file in the root directory:
sudo vim /var/www/html/info.php
Inside the file we are going to paste the following PHP code:
Once the file is saved, now in the address bar of the browser we will have to write ip-address / info.php. Replace ip-address with your current IP. If you are using a local machine, type 127.0.0.1/info.php o localhos / info.php. This should display the PHP information.
Run PHP-FPM with Apache
We are going to find two ways to run PHP code with the Apache web server. With the PHP Apache module and with PHP-FPM.
In the above steps, the Apache PHP7.4 module is used to handle the PHP code. This is generally fine, but in some cases we must execute PHP code with PHP-FPM. To do it, we will have to disable the Apache PHP7.4 module:

Now let’s install PHP-FPM:

sudo apt install php7.4-fpm
We continue enabling proxy_fcgi and setenvif module:

sudo a2enmod proxy_fcgi setenvif
The next step will be enable config file /etc/apache2/conf-available/php7.4-fpm.conf:

Then we must restart apache:
sudo systemctl restart apache2
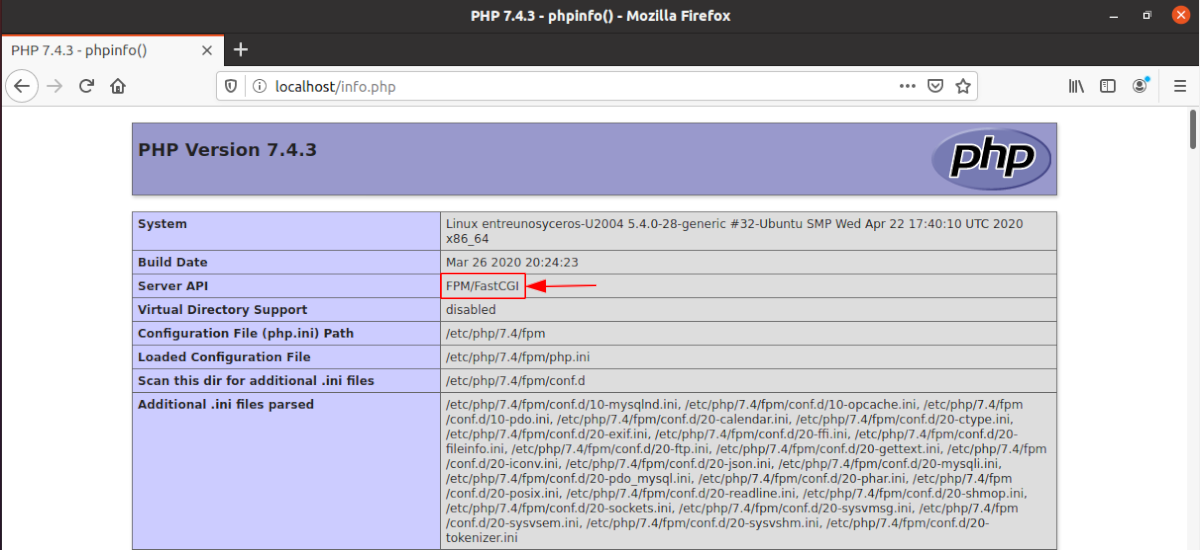
Now if you refresh the page info.php in the browser, you will find that Server API changed from Apache 2.0 Handler to FPM / FastCGI, which means that the Apache web server will pass the requests from PHP to PHP-FPM.
To finish and for the security of the server, we must delete the info.php file.
The content of the article adheres to our principles of editorial ethics. To report an error click here.
Full path to article: ubunlog » Ubuntu » LAMP, install Apache, MariaDB and PHP on Ubuntu 20.04
6 comments, leave yours
Leave a Comment Cancel reply

Vladimir Kozick said
Pablo said
yoredut said
Damien A. said
Jig said
isidro said
the steps are correct but a little more testing with mysql root user is missing. The info.php file did not work for me