How to parse JSON Objects on Android using Kotlin?
This example demonstrates how to parse JSON Objects on Android using Kotlin.
Step 1 − Create a new project in Android Studio, go to File ⇒ New Project and fill all required details to create a new project.
Step 2 − Add the following code to res/layout/activity_main.xml.
Step 3 − Create a new asset folder and create a user_list.json file and the code mentioned below.
Step 4 − Add the following code to src/MainActivity.kt
import android.os.Bundle import androidx.appcompat.app.AppCompatActivity import androidx.recyclerview.widget.LinearLayoutManager import androidx.recyclerview.widget.RecyclerView import org.json.JSONException import org.json.JSONObject import java.io.IOException import java.nio.charset.Charset class MainActivity : AppCompatActivity() < var personName: ArrayList= ArrayList() var emailId: ArrayList = ArrayList() var mobileNumbers: ArrayList = ArrayList() override fun onCreate(savedInstanceState: Bundle?) < super.onCreate(savedInstanceState) setContentView(R.layout.activity_main) title = "KotlinApp" val recyclerView = findViewById(R.id.recyclerView) val linearLayoutManager = LinearLayoutManager(applicationContext) recyclerView.layoutManager = linearLayoutManager try < val obj = JSONObject(loadJSONFromAsset()) val userArray = obj.getJSONArray("users") for (i in 0 until userArray.length()) < val userDetail = userArray.getJSONObject(i) personName.add(userDetail.getString("name")) emailId.add(userDetail.getString("email")) val contact = userDetail.getJSONObject("contact") mobileNumbers.add(contact.getString("mobile")) >> catch (e: JSONException) < e.printStackTrace() >val customAdapter = CustomAdapter(this@MainActivity, personName, emailId, mobileNumbers) recyclerView.adapter = customAdapter > private fun loadJSONFromAsset(): String < val json: String? try < val inputStream = assets.open("users_list.json") val size = inputStream.available() val buffer = ByteArray(size) val charset: Charset = Charsets.UTF_8 inputStream.read(buffer) inputStream.close() json = String(buffer, charset) >catch (ex: IOException) < ex.printStackTrace() return "" >return json > > Step 5 − Create a new class CustomAdapter.kt and add the following code −
import android.content.Context import android.view.LayoutInflater import android.view.View import android.view.ViewGroup import android.widget.TextView import android.widget.Toast import androidx.recyclerview.widget.RecyclerView import androidx.recyclerview.widget.RecyclerView.ViewHolder import java.util.* class CustomAdapter( private var context: Context, private var personNames: ArrayList, private var emailIds: ArrayList, private var mobileNumbers: ArrayList ) : RecyclerView.Adapter() < override fun onCreateViewHolder(parent: ViewGroup, viewType: Int): MyViewHolder < val v = LayoutInflater.from(parent.context).inflate(R.layout.rowlayout, parent, false) return MyViewHolder(v) >override fun onBindViewHolder(holder: MyViewHolder, position: Int) < // set the data in items holder.name.text = personNames[position] holder.email.text = emailIds[position] holder.mobileNo.text = mobileNumbers[position] // implement setOnClickListener event on item view. holder.itemView.setOnClickListener < // display a toast with person name on item click Toast.makeText(context, personNames[position], Toast.LENGTH_SHORT).show() >> override fun getItemCount(): Int < return personNames.size >inner class MyViewHolder(itemView: View) : ViewHolder(itemView) < var name: TextView = itemView.findViewById(R.id.tvName) as TextView var email: TextView = itemView.findViewById(R.id.tvEmail) as TextView var mobileNo: TextView = itemView.findViewById(R.id.tvMobile) as TextView > >
Step 6 − Create a layout resource file row.xml and add the following code
Step 7 − Add the following code to androidManifest.xml
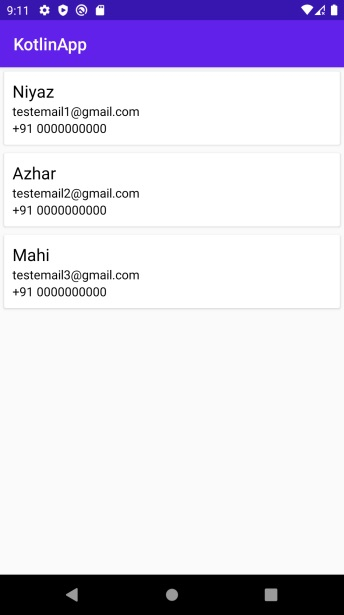
Let’s try to run your application. I assume you have connected your actual Android Mobile device with your computer. To run the app from android studio, open one of your project’s activity files and click the Run icon from the toolbar. Select your mobile device as an option and then check your mobile device which will display your default screen.
Click here to download the project code.
Библиотека GSON
Библиотека GSON была разработана программистами Google и позволяет конвертировать объекты JSON в Java-объекты и наоборот.
Установим зависимость в Gradle.
implementation 'com.google.code.gson:gson:2.8.5' Конвертируем объект в JSON
Создадим простейший класс Cat с открытыми полями.
package ru.alexanderklimov.gsondemo; public class Cat < public String name; // имя public int age; // возраст public int color; // цвет // Конструктор public Cat()< >> Попробуем сконвертировать объект созданного класса в JSON при помощи метода toJson().
Cat murzik = new Cat(); murzik.name = "Мурзик"; murzik.age = 9; murzik.color = Color.BLACK; GsonBuilder builder = new GsonBuilder(); Gson gson = builder.create(); Log.i("GSON", gson.toJson(murzik)); Вот так просто можно превратить объект в строку. Это удобно при передаче данных, например, из приложения на сервер.
Перепишем пример немного иначе.
Cat barsik = new Cat(); barsik.name = "Барсик"; barsik.age = 8; Gson gson = new Gson(); Log.i("GSON", gson.toJson(barsik)); Смотрим на ответ. Теперь все данные данные выводятся по алфавиту.
Конвертируем JSON в объект
Естественно, нам нужно уметь выполнять и обратную задачу. Допустим с сервера пришёл ответ в виде JSON-строки и мы должны из неё построить объект для работы в своём приложении. В этом случае вызывается метод fromJson().
String jsonText = ""; GsonBuilder builder = new GsonBuilder(); Gson gson = builder.create(); Cat murzik = gson.fromJson(jsonText, Cat.class); Log.i("GSON", "Имя: " + murzik.name + "\nВозраст: " + murzik.age); В этом примере нам пришлось экранировать кавычки. Но суть от этого не меняется. Получив строку, мы смогли создать объект murzik и узнать его имя, возраст, цвет.
Сложный класс
Класс Cat состоит из примитивных типов. Но иногда классы содержат объекты других классов. Усложним класс, добавив новый класс Address.
// Cat.java package ru.alexanderklimov.gsondemo; public class Cat < public String name; // имя public int age; // возраст public int color; // цвет public Address address; public Cat()< >> // Address.java package ru.alexanderklimov.gsondemo; public class Address < String street; String city; String country; public Address(String street, String city, String country)< this.street = street; this.city = city; this.country = country; >> Cat murzik = new Cat(); murzik.name = "Мурзик"; murzik.age = 9; murzik.color = Color.BLACK; murzik.address = new Address("Arbat", "Moscow", "Russia"); GsonBuilder builder = new GsonBuilder(); Gson gson = builder.create(); Log.i("GSON", gson.toJson(murzik)); // ,"age":9,"color":-16777216,"name":"Мурзик"> GSON справился с заданием и показал правильный результат (опять по алфавиту).
Пробуем в обратном порядке — из json-строки получим объект.
String jsonText = ",\"age\":11,\"color\":-16777216,\"name\":\"Murzik\">"; GsonBuilder builder = new GsonBuilder(); Gson gson = builder.create(); Cat murzik = gson.fromJson(jsonText, Cat.class); Log.i("GSON", "Имя: " + murzik.name + "\nВозраст: " + murzik.age + "\nCity: " + murzik .address.city); // GSON: Имя: Murzik // Возраст: 11 // City: New York Аннотации
Можно использовать аннотации, чтобы помочь библиотеке разобраться с полями класса, если они не совпадают с нужным именем в json.
@SerializedName("Id") public long id; Мы не рассмотрели примеры, когда объект содержит массив/список элементов, отображения (Map), Set.
Пример для Kotlin
На данный момент использовать библиотеку GSON в Kotlin не рекомендуется, так как она не учитывает возможности языка при работе с null. Используйте альтернативы в виде библиотек Moshi, Jackson или специального плагина kotlinx.serialization.
Тем не менее приведу один пример. Для простоты создадим строку самостоятельно в формате JSON.
Создадим класс Cat на основе этого файла.
data class Cat(val name: String, val age: Int, val isAwesome: Boolean) Строим объект через метод fromJson().
val jsonStr = """ < "name": "Barsik", "age": 21, "isAwesome": true >""".trimIndent() val cat: Cat = Gson().fromJson(jsonStr, Cat::class.java) println(cat) How to parse JSON in Android using Kotlin

We’re going to parse JSON without using any 3rd party library but using the java class JSONTokener.
With the JSONTokener, we can parse a JSON string into an object. These objects can be cast as JSONObject or as JSONArray. In that way, we’ll be able to read the JSON values.
I’ll cover 3 cases that may you face when you’re trying to parse JSON:
- Simple JSON: Just a simple JSON without any complex structure
- Array JSON: The JSON structure begins with an array and without a key
- Nested JSON: Includes nested objects
Simple JSON
A simple JSON doesn’t have any complex structure, like arrays, nested objects, e.t.c, and it looks like that:
< "id": "1", "employee_name": "Jack Full", "employee_salary": "300800", "employee_age": "61" >Code language: Swift (swift)After getting the response from the HTTP request, you parse the JSON string into JSONObject, to get the JSON values:
val jsonObject = JSONTokener(response).nextValue() as JSONObject // ID val >"id") Log.i("ID: ", id) // Employee Name val employeeName = jsonObject.getString("employee_name") Log.i("Employee Name: ", employeeName) // Employee Salary val employeeSalary = jsonObject.getString("employee_salary") Log.i("Employee Salary: ", employeeSalary) // Employee Age val employeeAge = jsonObject.getString("employee_age") Log.i("Employee Age: ", employeeAge)Code language: Kotlin (kotlin)Array JSON
Sometimes, you might see a JSON start with an array and without having a key:
[ < "id": "1", "employee_name": "Tiger Nixon", "employee_salary": "320800", "employee_age": "61" >, < "id": "2", "employee_name": "Garrett Winters", "employee_salary": "170750", "employee_age": "63" >, // . ]Code language: Swift (swift)After getting the response, you parse the JSON string into a JSONArray, and you’re looping through the array to get the JSON values.
val jsonArray = JSONTokener(response).nextValue() as JSONArray for (i in 0 until jsonArray.length()) < // ID val >"id") Log.i("ID: ", id) // Employee Name val employeeName = jsonArray.getJSONObject(i).getString("employee_name") Log.i("Employee Name: ", employeeName) // Employee Salary val employeeSalary = jsonArray.getJSONObject(i).getString("employee_salary") Log.i("Employee Salary: ", employeeSalary) // Employee Age val employeeAge = jsonArray.getJSONObject(i).getString("employee_age") Log.i("Employee Age: ", employeeAge) // Save data using your Model // Notify the adapter > // Pass adapter to the RecyclerView adapterCode language: Kotlin (kotlin)Tip: If a key does not exist in some objects, you can set it as optional like this:
val >
Nested JSON
When a JSON object is inside another JSON object, it’s called ‘nested’ and will look like the following JSON structure:
< "data": [ < "id": "1", "employee": < "name": "Tiger Nixon", "salary": < "usd": 320800, "eur": 273545 >, "age": "61" > >, < "id": "2", "employee": < "name": "Garrett Winters", "salary": < "usd": 170750, "eur": 145598 >, "age": "63" > >, // . ] >Code language: Swift (swift)After getting the response, you parse the JSON string into a JSONObject. Then you get the “data” as a JSONArray and loop it through the array.
val jsonObject = JSONTokener(response).nextValue() as JSONObject val jsonArray = jsonObject.getJSONArray("data") for (i in 0 until jsonArray.length()) < // ID val >"id") Log.i("ID: ", id) // Employee val employee = jsonArray.getJSONObject(i).getJSONObject("employee") // Employee Name val employeeName = employee.getString("name") Log.i("Employee Name: ", employeeName) // Employee Salary val employeeSalary = employee.getJSONObject("salary") // Employee Salary in USD val employeeSalaryUSD = employeeSalary.getInt("usd") Log.i("Employee Salary in USD: ", employeeSalaryUSD.toString()) // Employee Salary in EUR val employeeSalaryEUR = employeeSalary.getInt("eur") Log.i("Employee Salary: ", employeeSalaryEUR.toString()) // Employee Age val employeeAge = employee.getString("age") Log.i("Employee Age: ", employeeAge) // Save data using your Model // Notify the adapter > // Pass adapter to the RecyclerView adapterCode language: Kotlin (kotlin)If you have any questions, please feel free to leave a comment below