- How to set JAVA_HOME, GRADLE_HOME & ANDROID_SDK_ROOT path in Windows 11
- How to set JAVA_HOME & JAVAC in Windows 10
- 1. Open Advanced System Settings
- 2. Set JAVA_HOME Environment variable
- 3. Update System PATH
- 4. Test your configuration
- Other Popular Posts
- Comments & Share Post
- Popular Posts
- Related Posts
- Kotlin Basics for Beginner
- Write for us
- Variables in Kotlin – val vs var (mutable or immutable)
- About The Author
- How to set java sdk path in androidstudio?
- Method 1: Using the Android Studio Preferences
- Setting Java SDK path in Android Studio using Preferences
- Method 2: Modifying the local.properties File
- Method 3: Setting the JAVA_HOME Environment Variable
- Different Ways to Change Android SDK Path in Android Studio
- Why There is a Need to Change Android SDK Path?
- Method 1
- Method 2
- Method 3
How to set JAVA_HOME, GRADLE_HOME & ANDROID_SDK_ROOT path in Windows 11
Setting variable path is tedious job if you have just started coding. In this blog post I’ll explain how to set different variable like JAVA_HOME, GRADLE_HOME OR ANDROID_SDK_ROOT path in Windows 11 or older version.
How to set JAVA_HOME & JAVAC in Windows 10
1. Open Advanced System Settings
In Windows 10 press Windows key + Pause Key, This will open the System Settings window. Go to Change settings and select the Advanced tab.
Alternatively:
Open “Windows search” – you will find it next to the Windows logo
1. In the search field type in – advanced system settings
2. Click on the match on top of the list
2. Set JAVA_HOME Environment variable
In the “System Properties window” click “Environment Variables…”
Under “System variables” click the “New…” button and enter JAVA_HOME as “Variable name” and the path to your Java JDK directory under “Variable value”
3. Update System PATH
1. In “Environment Variables” window under “System variables” select Path
3. In “Edit environment variable” window click “New”
4. Type in %JAVA_HOME%\bin
4. Test your configuration
Open a new command prompt and type in:
this will print out the directory JAVA_HOME points to or empty line if the environment variable is not set correctly
this will print out the java compiler version if the Path variable is set correctly or “javac is not recognized as an internal or external command…” otherwise. UPDATE: in the comments below, several suggest running the command prompt as administrator if you see the error message. Please make sure you try this option
Other Popular Posts

This exercise is an explanation of my Best Selling Course Apache Cordova – Build Hybrid Mobile App for Android & iOS published on Udemy.
Use below link to get upto 95% discount on my courses on Udemy. https://www.udemy.com/course/apache-cordova/?referralCode=7254ECD5F74969030BF2
Comments & Share Post
Popular Posts
Related Posts

Kotlin Basics for Beginner

Write for us

Variables in Kotlin – val vs var (mutable or immutable)
About The Author
Gaurab Kumar
My name is Gaurab and this is my personal blog where I share my knowledge. You can get tutorial about android development, IOS and much more. Instill Learning is another site where you can get information about online courses, Corporate Training, Classroom Training and much more.
How to set java sdk path in androidstudio?
Setting the Java SDK path in Android Studio is an important step in the process of developing and building Android applications. This path is required so that the Android Studio can access the necessary tools and libraries for building and testing the applications. Sometimes, the SDK path might not be set correctly during the installation of Android Studio, and this can cause errors and prevent you from building your projects. In this article, we will look at the methods to set the Java SDK path in Android Studio.
Method 1: Using the Android Studio Preferences
Setting Java SDK path in Android Studio using Preferences
- Open Android Studio and click on «File» in the top menu bar.
- Click on «Project Structure» in the drop-down menu.
- In the left-hand panel, click on «SDK Location».
- Under «JDK Location», click on the ellipsis button (…) to browse for the Java SDK path.
- Navigate to the location where your Java SDK is installed and select the root folder.
- Click «OK» to save the configuration.
// Sample code to get the Java SDK path in Android Studio File javaHome = new File(System.getProperty("java.home")); System.out.println("Java SDK path: " + javaHome.getAbsolutePath());In the above code, System.getProperty(«java.home») returns the path of the Java SDK installed on the system. File(javaHome.getAbsolutePath()) creates a new File object with the Java SDK path as its argument.
// Sample code to set the Java SDK path in Android Studio String javaSdkPath = "/usr/lib/jvm/java-11-openjdk-amd64"; Project project = ProjectManager.getInstance().getDefaultProject(); Sdk sdk = ProjectJdkTable.getInstance().findJdk("11"); if (sdk == null) sdk = new ProjectJdkImpl("11", new JavaSdkImpl(), javaSdkPath, ""); ProjectJdkTable.getInstance().addJdk(sdk); > ProjectRootManager.getInstance(project).setProjectSdk(sdk);In the above code, javaSdkPath is the path of the Java SDK that you want to set. ProjectManager.getInstance().getDefaultProject() gets the default project instance. ProjectJdkTable.getInstance().findJdk(«11») tries to find the JDK with version 11. If it is not found, a new ProjectJdkImpl object is created with the name «11», JavaSdkImpl() as the SDK type, javaSdkPath as the path, and an empty string as the version string. ProjectJdkTable.getInstance().addJdk(sdk) adds the new JDK to the JDK table. Finally, ProjectRootManager.getInstance(project).setProjectSdk(sdk) sets the project SDK to the newly added JDK.
Method 2: Modifying the local.properties File
To set the Java SDK path in Android Studio using the local.properties file, follow these steps:
- Open your project in Android Studio.
- In the Project pane, select the Android view.
- Right-click on your app module and select «Open Module Settings».
- In the «Project Structure» dialog box, select «SDK Location».
- Note the «JDK location» path, and close the dialog box.
Now, to set the JDK path using the local.properties file:
- In the Project pane, select the Project view.
- Expand the Gradle Scripts folder, and open the file named «local.properties».
- Add the following line to the file, replacing the path with the path to your JDK installation:
org.gradle.java.home=/path/to/jdkNow, when you build your project in Android Studio, it will use the JDK specified in the local.properties file.
org.gradle.java.home=/Library/Java/JavaVirtualMachines/jdk1.8.0_291.jdk/Contents/HomeThis code sets the JDK path to «/Library/Java/JavaVirtualMachines/jdk1.8.0_291.jdk/Contents/Home».
Note: Make sure to replace the path in the example code with the path to your JDK installation.
Method 3: Setting the JAVA_HOME Environment Variable
To set the Java SDK path in Android Studio using the JAVA_HOME environment variable, follow these steps:
- Open the Terminal or Command Prompt and type echo $JAVA_HOME to check if the JAVA_HOME environment variable is already set. If it is set, you will see the path to the Java SDK directory.
- If the JAVA_HOME environment variable is not set, you need to set it. To do this, open the Terminal or Command Prompt and type:
export JAVA_HOME=/path/to/java/sdkHere is an example of how to set the JAVA_HOME environment variable on a Mac:
export JAVA_HOME=/Library/Java/JavaVirtualMachines/jdk1.8.0_281.jdk/Contents/HomeAnd here is an example of how to set the JAVA_HOME environment variable on a Windows machine:
setx JAVA_HOME "C:\Program Files\Java\jdk1.8.0_281"Note that the path to your Java SDK directory may be different depending on your operating system and the version of Java that you have installed.
Different Ways to Change Android SDK Path in Android Studio
Android SDK is one of the most useful components which is required to develop Android Applications. Android SDK is also referred to as the Android Software Development Kit which provides so many features which are required in Android which are given below:
- A sample source code.
- An Emulator.
- Debugger.
- Required set of libraries.
- Required APIs for Android development with their documentation.
- Tutorials required for Android OS development.
Why There is a Need to Change Android SDK Path?
Android SDK comes itself when we download Android Studio. It downloads when we download our Android Studio. But many times due to some issue in our pc these SDK files may get deleted. And without your Android SDK Android studio is not able to work and we cannot develop any application. Android SDK is the heart of Android studio. We can easily download Android SDK from the android developers’ site, but we have to set the path for this SDK in our Android studio as well to use this SDK.
Now the point that comes here is how we can change the SDK path for our Android application in Android Studio. So in this article, we are going to discuss three different methods to Change Android SDK Path in Android Studio.
Method 1
Step 1: Create a new Project in Android Studio
Navigate to the File > New > New Project and create your new project. The language used for this will not matter as this process will be the same for both java as well as Kotlin.
Step 2: Opening project structure
Navigate to the File > Click on Project structure which is shown in the list and click on the Project structure option. After clicking that option you will get to see the below screen.

Inside the above screen, click on the SDK Location option you will get to see the below screen.
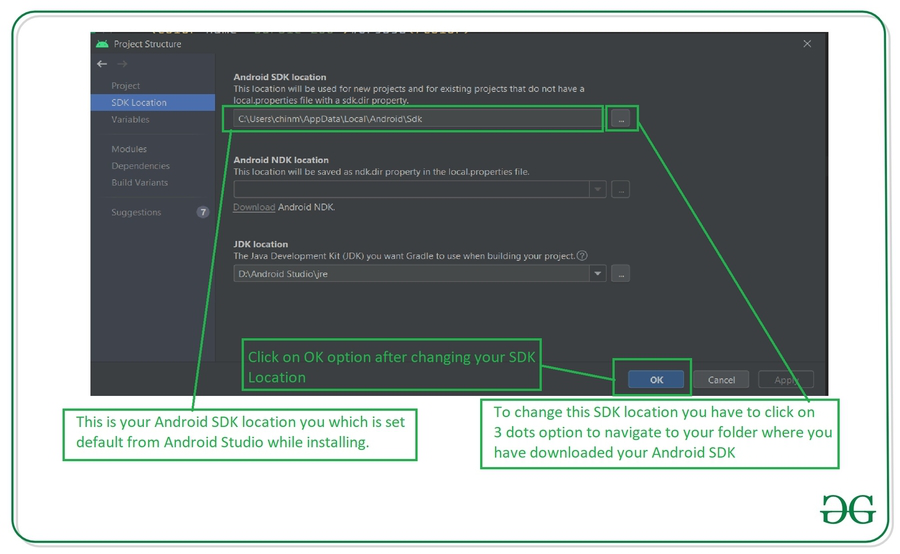
In the above image, you will get to see the current SDK location for your Android Studio. To change this SDK location you have to click on the 3 dots which are being displayed and then select your SDK location folder. After selecting this folder click on the OK option to save your SDK path.
Step 3: Sync your project after adding your SDK path
Now sync your project with Gradle files to check that SDK is working fine. To do this click on File > you will get to see the option as Sync Project With Gradle files option click on that option and sync your project. On successful sync of your project, your SDK location is set perfectly and now you are good to go in developing Android Applications.
Method 2
Step 1: Create a new Project in Android Studio
Navigate to the File > New > New Project and create your new project. The language used for this will not matter as this process will be the same for both java as well as Kotlin.
Step 2: Opening Android Studio Settings
Navigate to the File > Settings option you will get to see below dialog screen. Inside that screen. Click on Appearance and Behavior option > System Settings options and then click on the Android SDK option to get to see the below screen.

Inside this screen, you will get to see your SDK path. You can update your SDK path by clicking on the Edit option. After that select your SDK path, then click on Apply option, and then click on the OK option.
Step 3: Sync your project after adding your SDK path
Now sync your project with Gradle files to check that SDK is working fine. To do this click on File > you will get to see the option as Sync Project With Gradle files option click on that option and sync your project. On successful sync of your project, your SDK location is set perfectly and now you are good to go in developing Android Applications.
Method 3
Step 1: Create a new Project in Android Studio
Navigate to the File > New > New Project and create your new project. The language used for this will not matter as this process will be the same for both java as well as Kotlin.
Step 2: Opening project structure.
Inside your Android Studio in the top right corner, You can get to see the icon below the image for opening the project structure. Click on that option to open your project structure option. You will get to see the below screen. For opening this Project Structure we can also use a shortcut key as:

After clicking on this option we simply have to follow Step 1 to update our Android SDK.

Inside the above screen, click on the SDK Location option you will get to see the below screen.

In the above image, you will get to see the current SDK location for your Android Studio. To change this SDK location you have to click on the 3 dots which are being displayed and then select your SDK location folder. After selecting this folder click on the OK option to save your SDK path.
Step 3: Sync your project after adding your SDK path
Now sync your project with Gradle files to check that SDK is working fine. To do this click on File > you will get to see the option as Sync Project With Gradle files option click on that option and sync your project. On successful sync of your project, your SDK location is set perfectly and now you are good to go in developing Android Applications.