- Getting started with conda
- Before you start
- Contents
- Starting conda
- Managing conda
- Managing environments
- Managing Python
- Getting started with Anaconda Distribution#
- Should I use Anaconda Navigator or conda?#
- Free Anaconda Learning course — Get Started with Anaconda#
- An introduction to Navigator and the command line#
- What’s next?#
- Navigator tutorials#
- Conda resources#
- IDE tutorials#
- Jupyter Notebook external resources#
- Spyder external resources#
- Your first Python program: Hello, Anaconda!#
- Launching development environment applications from Navigator#
- Open Navigator#
- Run Python in Spyder#
- Run Python in a Jupyter Notebook#
- Close Navigator#
- Write a Python program using a CLI#
- Open your CLI#
- Start Python#
- Write a Python program#
- Exit Python#
- Optional: Launch Spyder or Jupyter Notebook from the command line#
Getting started with conda
Conda is a powerful package manager and environment manager that you use with command line commands at the Anaconda Prompt for Windows, or in a terminal window for macOS or Linux.
This 20-minute guide to getting started with conda lets you try out the major features of conda. You should understand how conda works when you finish this guide.
SEE ALSO: Getting started with Anaconda Navigator, a graphical user interface that lets you use conda in a web-like interface without having to enter manual commands. Compare the Getting started guides for each to see which program you prefer.
Before you start
Contents
- Starting conda on Windows, macOS, or Linux. 2 MINUTES
- Managing conda . Verify that Anaconda is installed and check that conda is updated to the current version. 3 MINUTES
- Managing environments . Create environments and move easily between them. 5 MINUTES
- Managing Python . Create an environment that has a different version of Python. 5 MINUTES
- Managing packages . Find packages available for you to install. Install packages. 5 MINUTES
Starting conda

- From the Start menu, search for and open «Anaconda Prompt.»
On Windows, all commands below are typed into the Anaconda Prompt window.
On macOS, all commands below are typed into the terminal window.
On Linux, all commands below are typed into the terminal window.
Managing conda
Verify that conda is installed and running on your system by typing:
Conda displays the number of the version that you have installed. You do not need to navigate to the Anaconda directory.
If you get an error message, make sure you closed and re-opened the terminal window after installing, or do it now. Then verify that you are logged into the same user account that you used to install Anaconda or Miniconda.
Update conda to the current version. Type the following:
Conda compares versions and then displays what is available to install.
If a newer version of conda is available, type y to update:
We recommend that you always keep conda updated to the latest version.
Managing environments
Conda allows you to create separate environments containing files, packages, and their dependencies that will not interact with other environments.
When you begin using conda, you already have a default environment named base . You don’t want to put programs into your base environment, though. Create separate environments to keep your programs isolated from each other.
- Create a new environment and install a package in it. We will name the environment snowflakes and install the package BioPython. At the Anaconda Prompt or in your terminal window, type the following:
conda create --name snowflakes biopython
Conda checks to see what additional packages («dependencies») BioPython will need, and asks if you want to proceed:
conda activate only works on conda 4.6 and later versions.
For conda versions prior to 4.6, type:
Now that you are in your snowflakes environment, any conda commands you type will go to that environment until you deactivate it.
conda environments: base /home/username/Anaconda3 snowflakes * /home/username/Anaconda3/envs/snowflakes
When the environment is deactivated, its name is no longer shown in your prompt, and the asterisk (*) returns to base. To verify, you can repeat the conda info —envs command.
Managing Python
When you create a new environment, conda installs the same Python version you used when you downloaded and installed Anaconda. If you want to use a different version of Python, for example Python 3.5, simply create a new environment and specify the version of Python that you want.
- Create a new environment named «snakes» that contains Python 3.9:
conda create --name snakes python=3.9
conda activate only works on conda 4.6 and later versions.
For conda versions prior to 4.6, type:
Conda displays the list of all environments with an asterisk (*) after the name of the active environment:
# conda environments: # base /home/username/anaconda3 snakes * /home/username/anaconda3/envs/snakes snowflakes /home/username/anaconda3/envs/snowflakes
The active environment is also displayed in front of your prompt in (parentheses) or [brackets] like this:
Getting started with Anaconda Distribution#
Welcome to Anaconda! This document is here to help you get started with Anaconda Distribution, the free installation that includes conda, Anaconda Navigator, and over 250 scientific and machine learning packages .
Should I use Anaconda Navigator or conda?#
Anaconda Navigator is a desktop application that is included with every installation of Anaconda Distribution. It is built on top of conda, the open-source package and environment manager, and allows you to manage your packages and environments from a graphical user interface (GUI). This is especially helpful when you’re not comfortable with the command line.
A command line interface (or CLI) is a program on your computer that processes text commands to do various tasks. Conda is a CLI program, which means it can only be used via the command line. On Windows computers, Anaconda recommends that you use the Anaconda Prompt CLI to work with conda. MacOS and Linux users can use their built-in command line applications.
If you installed Miniconda instead of Anaconda Distribution (see Should I use Anaconda Distribution or Miniconda? ), Anaconda Navigator is not included. Use the command conda install anaconda-navigator to manually install Navigator onto your computer.
Free Anaconda Learning course — Get Started with Anaconda#
Learn to use Anaconda Navigator to launch an application. Then, create and run a simple Python program with Spyder and Jupyter Notebook. Watch our short training videos on Anaconda Learning to get up and running with Jupyter Notebook and JupyterLab, along with several other popular integrated development environments (IDEs):

An introduction to Navigator and the command line#
Navigator and the CLI interact with conda in similar but distinct ways, and each have their benefits and drawbacks. Anaconda recommends that you learn the basics of both to determine what is preferable for your programming workflow. See My first Python program: Hello, Anaconda! to go through a short programming exercise and get a better idea for what you prefer.
What’s next?#
Navigator tutorials#
Conda resources#
IDE tutorials#
The following tutorials show you the basics of using some popular IDEs (integrated development environments) with Anaconda:
Jupyter Notebook external resources#
Jupyter Notebook is a web-based development application that you can launch from Navigator. The resources below can help get you started and provide more information about using notebooks for your education, research, and work:
Spyder external resources#
Spyder is a free development environment that you can launch from Navigator. The resources below provide more information about using notebooks for your education, research, and work:
Uninstalling Anaconda Distribution
What is Anaconda Distribution?
Your first Python program: Hello, Anaconda!#
This tutorial will take you through a short programming exercise, using Navigator and then a command line interface (CLI).
Launching development environment applications from Navigator#
We will first go through some short exercises using Anaconda Navigator to launch two different integrated development environments (IDEs), Spyder and Jupyter Notebook.
Open Navigator#
Choose the instructions for your operating system:
- Windows — From the Start menu, click the Anaconda Navigator desktop app.
- mcOS — Open Launchpad, then click the Anaconda-Navigator icon.
- Linux — Open a terminal window and use the command anaconda-navigator .
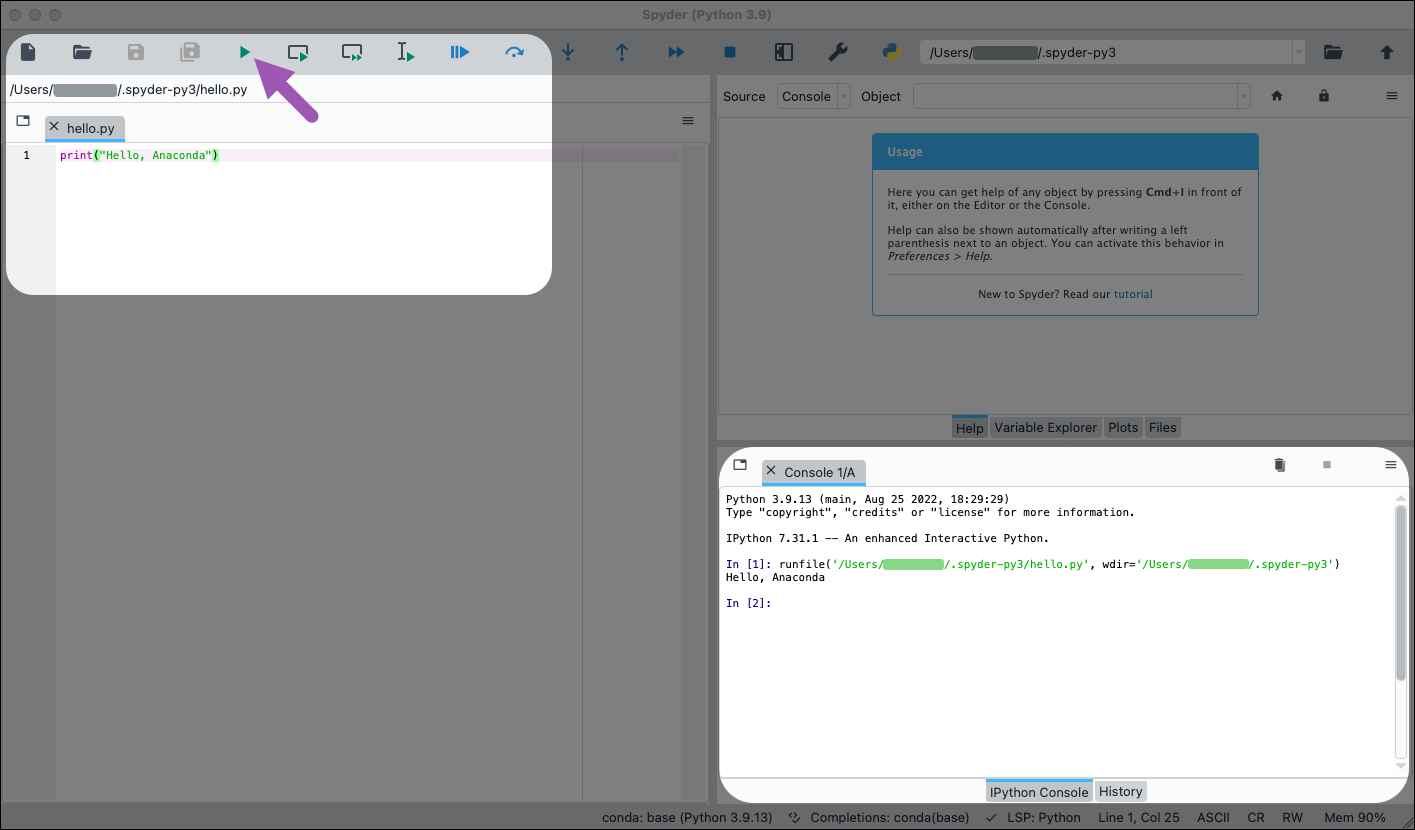
Run Python in Spyder#
More of a visual learner? Follow along with Create a simple Python program in Spyder on Anaconda Learning instead!
- On Navigator’s Home tab, in the applications pane on the right, launch the Spyder IDE from its tile.
Note If Spyder is not installed in your current environment, click Install to install it.
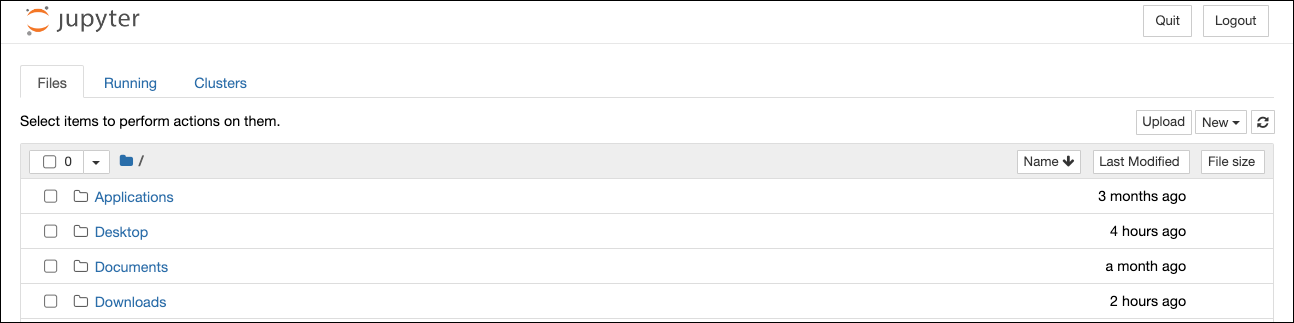
Run Python in a Jupyter Notebook#
More of a visual learner? Watch our short training videos on Jupyter Notebook and JupyterLab on Anaconda Learning instead!
- On Navigator’s Home tab, in the applications pane on the right, launch Jupyter Notebook from its tile.
Note If Jupyter Notebook is not installed in your current environment, click Install to install it.

Close Navigator#
From here, you can close Navigator and move on to the conda CLI tutorial below:
- Windows — Go to File >Quit in the Navigator File menu.
- macOS — Go to Anaconda Navigator >Quit Anaconda-Navigator in the top menu.
Write a Python program using a CLI#
Open your CLI#
There are many command line interface (CLI) options available to you. Anaconda recommends that Windows users use Anaconda Prompt, while macOS and Linux users are welcome to use whatever CLI they are comfortable with.
macOS and Linux users — If you aren’t seeing (base) in your chosen CLI, you need to either initialize conda or activate your base environment. See either the macOS or Linux install instructions for more information.
Start Python#
In your CLI, type python and press Enter or return.
A >>> appears in your CLI and means you are in the Python interpreter, which allows you to run simple scripts right from the command line.
Write a Python program#
At the >>> , type print(«Hello, Anaconda!») and press Enter or return.
When you press Enter or return, your program runs. The words “Hello, Anaconda!” print to the screen. You’re programming in Python!

Exit Python#
Optional: Launch Spyder or Jupyter Notebook from the command line#
- In your CLI, type spyder and press Enter or return. Spyder opens just like it does when launched from Anaconda Navigator.
- In your CLI, type jupyter-notebook and press Enter or return. Jupyter Notebook opens in a tab in your browser.
You can run the same exercises in Run Python in Spyder and Run Python in a Jupyter Notebook after opening Spyder and Jupyter Notebook from your CLI.
Should I use Anaconda Distribution or Miniconda?