So you have a website and you need to add code from a third party provide to your website? No problem, here’s how:
Using the HTML Editor you can easily insert virtually any embed code from third parties.
What is HTML or Embed Code? In simple terms it’s a code that adds a browser plugin or widget to your page. For example below is an sample of an embed code which is through YouTube. By adding this code to a designated area of your web page will load that feature from a third party right on your web page.
Example of embed code:
Where do I insert an Embed Code? This varies from provider to provider. For example Google Analytics code may need to be inserted before the
tag of your web page code while Youtube and other multimedia widgets would just be added to any content area of a page you desire.
How do I add Embed Code to my site? Let’s show you 2 ways to do this. The first method is extremely easy and anyone without any HTML knowledge can do this (Which is the preferred method by most users)
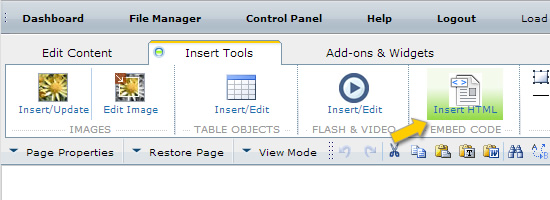
Method 1: Insert using «Insert HTML» Widget (Super Easy) 1. Open a webpage in the HTML Editor. 2. When the page loads click on the “Insert Tools” tab. 3. Put your mouse cursor where you want to insert the HTML code (ex. if it’s a paypal button this would be near/under a product you want to sell) 4. Select the “Insert HTML” option.
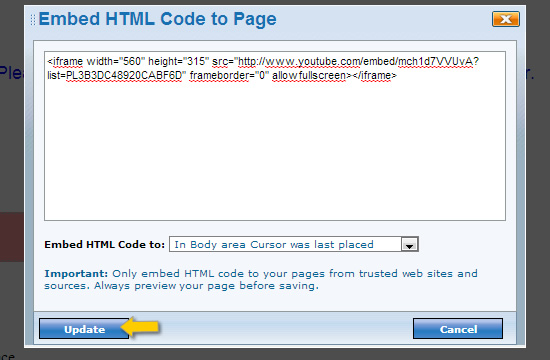
5. You will see the Embed HTML Code to Page pop-up (as shown bel0w). For most codes (ex. Paypal, YouTube, Vimeo, GoogleCheckout, etc..) you want to leave the default option (In Body area cursor was last placed) as is. Paste the code and your done and ready to preview!
If you have special codes such as Google Analytics or other tracking scripts they will often ask you to insert them in the header or footer tags. In that case you can select from the “Embed HTML Code to:” dropdown to select appropriate place.
That’s all there is to it! What if your a intermediate or advance user and need to access HTML through the source code? No problem you can use the method below:
Method 2: Insert using View Source option (For Advanced Users)
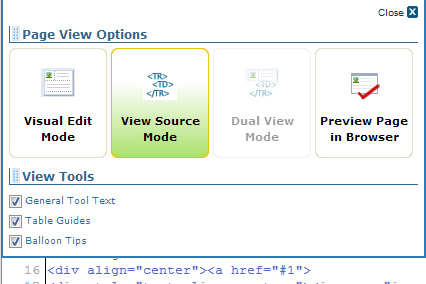
1. Open a webpage in the HTML Editor. 2. When the page loads click on the «View Mode» 3. Select the «View Source Mode’ option 4. This will load the HTML code of your page which looks something like this:
testdsf ssample content here. for testing in new interface.
5. Now depending on the requirement of your embed code provider you will need to carefully paste the code to an HTML area of your web page. This may take a few tries so you can insert and Preview your page until you get it right before publishing.
Tip: Let’s say you want to add paypal button code to your website. You want to first in your visual mode locate some text that is near area you want to insert the Button. This can serve as a cue so when you are in HTML mode you can Control + F (find) the text and paste your code near it.
6. Once you achieve the look/format and your page is intact then you can Publish your page via the Publish button.
You can then visit your website and fully refresh browser to load latest version of your page.
Important Notes: — Always make sure the code you are inserting is from a trusted source. For example Youtube, Vimeo, Google Analytics, Paypal, Google checkout are all trusted sources of embed codes so you have little to worry about. But take furhter caution to check from providers that don’t have a good reputation or have many complaints online about having virus or malware (For example unknown Ad providers and affliates you want to be more careful of)
С появлением возможности в Tobiz.net добавления на сайт HTML кода, постоянно возникают вопросы, каким образом это правильно делается. Как добавить Html код на свой сайт в нашем конструкторе вы можете узнать, просмотрев видео ниже.
Вставка Html на сайт
Для вставки HTML кода есть 2 способа. Первый — добавление кода в блок из редактора блоков. Второй — добавление стороннего кода в Настройках проекта в раздел Html код для вставки.
Конструктор не может гарантировать корректную работу вашего сайта при добавлении стороннего кода. Некоторые скрипты перекрывают коды конструктора, что приводит к багам на сайте.
Как вставить сторонний код с помощью блока
Функция вставки кода с помощью блока обычно используется для того, чтобы вставить какой-то виджет или другой инструмент именно на определенную страницу.
Зайдите в Проекты.
Войдите в редактор той страницы, куда хотите добавить HTML код, например, какого-то виджета.
Нажмите на кнопку Добавить блок.
Прокрутите список разделов в Библиотеке блоков и выберите раздел Ссылка и редактор.
Выберите блок секцию для вставки стороннего html кода.
Блок добавится в самый конец. С помощью кнопки со стрелками переместите блок туда, где вам нужно, чтобы отображался виджет.
Нажмите на блок и в пустое поле редактора кода введите ваш код. Не забудьте Сохранить.
Теперь HTML код добавлен на ваш сайт и открыв сайт в просмотре вы увидите инструмент, который вы добавили на сайт.
Как вставить HTML код на весь сайт
Второй способ добавления стороннего кода — вставка кода в Настройках проекта в разделе HTML код для вставки. Используется данный инструмент обычно при установке кода на весь сайт. Обычно таким образом вставляются метрики, карты, счетчики и другие сервисы, которые нужны на всех страницах сайта.
Зайдите в Проекты.
Найдите сайт, куда хотите вставить сторонний скрипт. Нажмите Настройки проекта.
Выберите раздел в левом меню «HTML код для вставки».
Перед вами появится два поля: Секция HEAD и Секция BODY. Вставьте свой код в секцию HEAD. Не забудьте Сохранить.
С помощью вставки кода в данном разделе вы сможете поменять шрифт, цвет шрифта и другие параметры на страницах. Предупреждаем: менять данные параметры стоит, если вы умеете работать с кодом.
Теперь у вас есть возможность, вставлять любой html.
Если вы обладаете навыками программирования, то вы сможете менять свой сайт до неузнаваемости.
Если вы обычный пользователь, то вы сможете добавить любой сервис, который вы хотели подключить к сайту.
Вы можете вносить корректировки в код сайта. Например, чтобы добавить сторонний конструктор, к примеру для кухонь на сайт.
For example, the HTML heading elements ( through ) are block-level elements that automatically place their content onto a new line and push any content that follows onto a new line. Each of these six heading elements represent a different heading size.
Let’s study how this works in practice. At the bottom of your index.html file, try pasting in the highlighted code snippet:
Save your file and reload it in the browser. You should receive something like this:
Let’s now inspect the block-level heading elements to study how they differ from the inline-level text elements above. Open up the Firefox Web Developer Inspector and hover over each of the elements to inspect their occupied space as indicated by the blue highlighting. You should be able to confirm that the occupied horizontal space of each of the inline-level elements is determined by its text content, while the occupied horizontal space of each of the block-level elements stretches across the entire web page:
Block-level elements will always push inline-level elements down to the next line, even if you write those HTML elements on the same line of the HTML document. To confirm this for yourself, try writing a block-level element and an inline-level element on the same line of your index.html file. Erase the existing content from your file and add the following code snippet:
Can you guess how this HTML code will render in the browser? Save your file and reload it in the browser. You should receive something like this:
Notice that the heading element has started on a new line and pushed the subsequent text element to a new line even though the elements were written on the same line in the HTML document.
You should now have an understanding of how inline-level and block-level elements are positioned and how they affect the position of nearby elements. Remembering their distinct behaviors can be useful when arranging HTML elements in the future.
We’ll continue learning about new inline and block elements in the tutorials ahead.
// Tutorial //
How To Nest HTML Elements
This tutorial will teach you how to nest HTML elements in order to apply multiple HTML tags to a single piece of content.
HTML elements can be nested, meaning that one element can be placed inside another element. Nesting allows you to apply multiple HTML tags to a single piece of content. For example, try pasting the following code snippet inside your index.html file:
strong>My bold text and em>my bold and emphasized textem>strong>
Save your file and reload it in the browser. (For instructions on creating an index.html file, please see our tutorial here or for loading the file in your browser, see our tutorial here.) You should receive something like this:
My bold text and my bold and emphasized text
Nesting Best Practices
Note that it is recommended to always close nested tags in the reverse order that they were opened. For example, in the example below, the tag closes first as it was the last tag to open. The tag closes last as it was the first to open.
This sentence contains HTML elements that are strong>em>nested according to best practicesem>strong>.
As a counter example, the following HTML code contains tags that are not nested according to best practices, as the tag closes before the tag:
This sentence contains HTML elements that are strong>em>not nested according to best practicesstrong>em>.
While not technically necessary for rendering your HTML in the browser, nesting your tags in the proper order can help improve the readability of your HTML code for you or other developers.
// Tutorial //
How To Use HTML Attributes
HTML attributes can be used to change the color, size, and other features of HTML elements. For example, you can use an attribute to change the color or size of a font for a text element or the width and height for an image element. In this tutorial, we’ll learn how to use HTML attributes to set values for the size and color properties of HTML text elements.
An HTML attribute is placed in the opening tag like this:
elementattribute="property:value;">
One common attribute is style , which allows you to add style properties to an HTML element. While it’s more common to use a separate stylesheet to determine the style of an HTML document, we will use the style attribute in our HTML document for this tutorial.
Using the Style Attribute
We can change multiple properties of an element with the style attribute. Clear your “index.html” file and paste the code below into your browser. (If you have not been following the tutorial series, you can review instructions for setting up an index.html file in our tutorial Setting Up Your HTML Project.
h1style="font-size:40px;color:green;">This text is 40 pixels and green.h1>
Before we load the file in our browser, let’s review each of the parts of this HTML element:
h1 is the name of the tag. It refers to the largest-sized Heading element.
style is the attribute. This attribute can take a variety of different properties.
font-size is the first property we’re setting for the style attribute.
40px; is the value for the property font-size , which sets the text content of the element to 40 pixels.
color is the second property we’re setting for the style attribute.
green is the value for the property color , which sets the text content color to green
Note that the properties and values are contained by quotation marks, and that each property:value pair ends with a semicolon ; .
Save the file and reload it in your browser. (For instructions on loading the file in your browser, see our tutorial here.) You should receive something like this: