- How do you add submenu in HTML?
- How do I create a vertical menu and submenu in HTML?
- How do I create a drop down drop down list in HTML?
- How to create menu with submenu using HTML?
- How to create an interactive menu in CSS?
- How to create a subnavigation menu in HTML?
- Подменю на CSS
- Комментарии ( 46 ):
- How TO — Subnav
- Example
- Minimal Drop-down Menu Bar with Submenu using HTML & CSS
- Video Tutorial of Minimal Dropdown Menu Bar or Navbar
- You might like this:
- Dropdown Menu Bar using HTML & CSS [Source Codes]
How do you add submenu in HTML?
element. Use a container element (like ) to create the dropdown menu and add the dropdown links inside it. Wrap a element around the button and the to position the dropdown menu correctly with CSS.
How do I create a vertical menu and submenu in HTML?
How to Use CSS Vertical Menu with Submenu
- First of load Font Awesome 5 for menu icons by adding the following CDN link in the head tag of your HTML page.
- After that, create HTML structure for vertical menu like below and add your menu links.
- Now its time to stylize your menu, you can add style.
How do I create a sub sub menu?
- Select pages that you want to use as sub menu item and add them to the menu area.
- You will see that they are added to the Menu Structure on the right.
- WordPress menu system supports drag and drop.
- Click on Save Menu to save your setup.
How do I create a drop down drop down list in HTML?
HTML) Use any element to open the dropdown content, e.g. a , or a element. Use a container element (like ) to create the dropdown content and add whatever you want inside of it. Wrap a element around the elements to position the dropdown content correctly with CSS.
How to create menu with submenu using HTML?
How to create a drop down menu in HTML?
How to create an interactive menu in CSS?
How to create a subnavigation menu in HTML?
Подменю на CSS
Давно хотел написать статью о том, как сделать подменю на CSS. Многие делают его на JQuery и получается достаточно неплохо, однако, весь базовый принцип создания подменю на CSS я изложу здесь. А уже дальше, отталкиваясь от этой базы, можно совершенствовать подменю дальше.
Привожу сразу CSS-код:
* html ul li float: left;
>
* html ul li a height: 1%;
>
ul border-bottom: 1px solid #000;
list-style: none;
margin: 0;
padding: 0;
width: 100px;
>
ul li position: relative;
>
ul li a display: block;
border: 1px solid #000;
border-bottom: 1px;
padding: 5px;
text-decoration: none;
>
li ul display: none;
left: 99px;
position: absolute;
top: 0;
>
li:hover ul display: block;
>
Самое главное здесь — это селектор «li:hover ul«. Фактически, он и показывает содержимое меню. По умолчанию, оно «display: none«, а при наведении курсора на пункт меню, подменю становится: «display: block«, то есть видимым. Это самое главное. Также в первых двух селекторах (которые со *) идёт CSS-хак для IE, иначе без него в этом браузере ничего работать не будет. Всё остальное — это внешний вид, который, безусловно, можно менять.
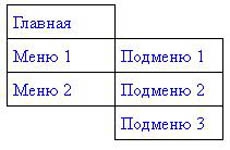
Если внимательно вдуматься в эту структуру, то становится всё очень понятно. Тег ul — создаёт меню. Если ul находится внутри другого ul, то это уже подменю. А тег li отвечает за конкретный пункт меню.
Разумеется, меню самое наипростейшее, как с точки зрения логики и структуры, так и с точки зрения дизайна. Разумеется, можно с помощью JQuery сделать плавное раскрытие. Можно также изменить дизайн, но весь принцип останется тем же, что и в этом подменю, написанном на CSS и HTML.

![]()
Создано 22.06.2011 14:18:07
Копирование материалов разрешается только с указанием автора (Михаил Русаков) и индексируемой прямой ссылкой на сайт (http://myrusakov.ru)!
Добавляйтесь ко мне в друзья ВКонтакте: http://vk.com/myrusakov.
Если Вы хотите дать оценку мне и моей работе, то напишите её в моей группе: http://vk.com/rusakovmy.
Если Вы не хотите пропустить новые материалы на сайте,
то Вы можете подписаться на обновления: Подписаться на обновления
Если у Вас остались какие-либо вопросы, либо у Вас есть желание высказаться по поводу этой статьи, то Вы можете оставить свой комментарий внизу страницы.
Порекомендуйте эту статью друзьям:
Если Вам понравился сайт, то разместите ссылку на него (у себя на сайте, на форуме, в контакте):
- Кнопка:
Она выглядит вот так: - Текстовая ссылка:
Она выглядит вот так: Как создать свой сайт - BB-код ссылки для форумов (например, можете поставить её в подписи):
Комментарии ( 46 ):
Спасибо за статью Михаил!Она оказалась очень полезной. Скажите,а как создать например в «Подменю 1» подменю второго уровня?
Думаю, что аналогично нужно и в CSS добавить строки. Если этого не сделать — то будет некрасивость)
А куда нужно написать сss код? У меня получается только html код
В отдельный CSS файл (style.css -> открыть с помощью Notepad (или другой текстовый редактор)) , или в тег в теге
Статья действительно оказалась полезной, спасибо. Возник только один вопрос: что делать если вместо меню 1 и меню 2 мне нужно поставить изображение?
пробовал, возникает проблемма. этакое смещение, т.е. меню возникает при наведении курсора на пространство левее и выше изображения.
How TO — Subnav
Use any element to open the subnav/dropdown menu, e.g. a , or
element.
Use a container element (like ) to create the subnav menu and add the subnav links inside it.
Wrap a element around the button and the to position the subnav menu correctly with CSS.
Step 2) Add CSS:
Example
/* The navigation menu */
.navbar overflow: hidden;
background-color: #333;
>
/* Navigation links */
.navbar a float: left;
font-size: 16px;
color: white;
text-align: center;
padding: 14px 16px;
text-decoration: none;
>
/* The subnavigation menu */
.subnav float: left;
overflow: hidden;
>
/* Subnav button */
.subnav .subnavbtn font-size: 16px;
border: none;
outline: none;
color: white;
padding: 14px 16px;
background-color: inherit;
font-family: inherit;
margin: 0;
>
/* Add a red background color to navigation links on hover */
.navbar a:hover, .subnav:hover .subnavbtn background-color: red;
>
/* Style the subnav content — positioned absolute */
.subnav-content display: none;
position: absolute;
left: 0;
background-color: red;
width: 100%;
z-index: 1;
>
/* Style the subnav links */
.subnav-content a float: left;
color: white;
text-decoration: none;
>
/* Add a grey background color on hover */
.subnav-content a:hover background-color: #eee;
color: black;
>
/* When you move the mouse over the subnav container, open the subnav content */
.subnav:hover .subnav-content display: block;
>
Minimal Drop-down Menu Bar with Submenu using HTML & CSS

Hello readers, Today in this blog you’ll learn how to create a Minimal Dropdown Menu Bar with Submenu in HTML & CSS only. Previously I have shared a Minimal Navigation Menu Bar using CSS but there is no submenu or drop menu features. So now it’s time to create a Dropdown Menu.
A drop-down menu (sometimes called a pull-down menu or list) is a graphical control element designed to help visitors find specific pages, contents, or features on your website. Clicking or hovering on a top-level menu heading indicates a list of options to the dropdown menu.
At first, on the webpage, there is only a small menu bar or navbar, but when you clicked on that menu bar then the menu list is sliding down and visible. Those submenus or drop menus are hidden at first and when you clicked on their parent menu item then the drop list is shown. I’ve also added a simple hover color on the list as you can see in the image.
If you’re feeling difficult to understand what I am saying. You can watch a full video tutorial on this program (Minimal Drop-down Menu Bar with Submenu using HTML & CSS).
Video Tutorial of Minimal Dropdown Menu Bar or Navbar
If you like this Dropdown Menu Bar and want to get source codes. You can easily get the source codes of this program. To get the source codes you just need to scroll down.
If you’re a beginner and you have basic knowledge of HTML & CSS then you can also create this type of minimal navbar or menu. I hope after watching this video tutorial, you’ve understood what is the actual codes and concepts behind creating this type of design. You can also easily use this program on your websites and projects.
You might like this:
Dropdown Menu Bar using HTML & CSS [Source Codes]
To create this program (Minimal Drop-down Menu Bar with Submenu). First, you need to create two Files one HTML File and another one is CSS File. After creating these files just paste the following codes in your file. First, create an HTML file with the name of index.html and paste the given codes in your HTML file. Remember, you’ve to create a file with .html extension.
Second, create a CSS file with the name of style.css and paste the given codes in your CSS file. Remember, you’ve to create a file with .css extension.
@import url(‘https://fonts.googleapis.com/css?family=Poppins:400,500,600,700&display=swap’); * < margin: 0; padding: 0; box-sizing: border-box; user-select: none; font-family: 'Poppins', sans-serif; >nav < position: absolute; top: 20%; left: 50%; transform: translate(-50%, -50%); background: #1b1b1b; width: 400px; line-height: 40px; padding: 8px 25px; border-radius: 5px; >nav label < color: white; font-size: 22px; font-weight: 500; display: block; cursor: pointer; >.button span < float: right; line-height: 40px; transition: 0.5s; >.button span.rotate < transform: rotate(-180deg); >nav ul < position: absolute; background: #1b1b1b; list-style: none; top: 75px; left: 0; width: 100%; border-radius: 5px; display: none; >[id^=btn]:checked + ul < display: block; >nav .menu:before < position: absolute; content: ''; height: 20px; width: 20px; background: #1b1b1b; right: 20px; top: -10px; transform: rotate(45deg); z-index: -1; >nav ul li < line-height: 40px; padding: 8px 20px; cursor: pointer; border-bottom: 1px solid rgba(0,0,0,0.2); >nav ul li label < font-size: 18px; >nav ul li a < color: white; text-decoration: none; font-size: 18px; display: block; >nav ul li a:hover, nav ul li label:hover < color: cyan; >nav ul ul < position: static; >nav ul ul li < line-height: 30px; padding-left: 30px; border-bottom: none; >nav ul ul li a < color: #e6e6e6; font-size: 17px; >nav ul li span < font-size: 20px; float: right; margin-top: 10px; padding: 0 10px; transition: 0.5s; >nav ul li span.rotate < transform: rotate(-180deg); >input
That’s all, now you’ve successfully created a Minimal Drop-down Menu Bar with Submenu using HTML & CSS. If your code not work or you’ve faced any error/problem then please comment down or contact us from the contact page.